There is a specific moment on the mountain when you realize your gloves have lost their grip. Your pole plants feel uncertain. You tighten your fist harder to compensate. By noon your forearm aches even though you haven’t skied anything particularly hard. That is grip failure — slow, invisible, and genuinely ruinous to a full ski day.
Knowing exactly how to add grip to ski gloves is one of the most practical maintenance skills serious skiers can learn. I have been testing grip solutions for 15 years: on leather palms and synthetic shells, in dry Utah powder, Pacific Coast slush, and icy East Coast hardpack. The range of methods that actually work — and the conditions under which each one fails — is wider than most guides acknowledge.
This guide covers every method I have tested personally, what the real-world results looked like, how to diagnose which problem you actually have, and how to choose the right fix for your specific gloves and situation. Not every method suits every glove or every skier. The goal is to get you to the right answer for your case, not hand you a list and leave you guessing.
Why Ski Glove Grip Fails: The Four Actual Causes
Most grip guides skip this section entirely, which is why so many skiers apply the wrong fix and conclude that nothing works. Grip fails through four distinct mechanisms. Each one requires a different response, and treating a moisture problem with an abrasion solution — or vice versa — produces nothing.
Surface abrasion
The most common cause. The palm material — whether leather, synthetic, or rubberized fabric — wears smooth through repeated contact with pole handles, chairlift rails, and boot buckles. This happens gradually and most skiers don’t notice until grip is already significantly degraded. Leather is particularly vulnerable because it polishes rather than crumbles. A leather palm that has gone glassy-smooth under good light will not recover from conditioning alone — the surface texture is physically gone.
Moisture contamination
Wet gloves grip worse than dry ones. Wet leather becomes slick because the surface oils that give it traction migrate out when the leather is saturated repeatedly without re-conditioning. Synthetic materials with depleted DWR coating absorb surface water and turn slippery. Even premium waterproof gloves require proper care to maintain performance, as explained in these GORE‑TEX glove care guidelines.
This kind of grip failure is weather-dependent — the gloves grip fine on dry days and fail in wet snow. Skiers frequently mistake this for general glove decline when it is a specific moisture management problem with a specific solution.
Material stiffening
Leather that hasn’t been conditioned stiffens and loses its ability to conform to the pole handle. A stiff glove cannot generate the palm-to-handle contact area that grip depends on. This feels different from surface abrasion — the glove grips initially but loses purchase under sustained load because the palm doesn’t flex and mold around the handle. Conditioning solves this completely. Adding texture on top of a stiff palm does not.
Wrong fit
A glove even slightly too large creates excess palm material that shifts under grip load. This is grip failure from geometry rather than material degradation. No grip treatment fixes a glove that doesn’t fit. I have watched skiers apply silicone dots, hockey tape, and rubber spray to gloves that were a size too large, then conclude that nothing works. Fit must be checked before treatment is considered.
Diagnose before you treat. Applying grip tape to a stiff leather glove that needs conditioning is wasted effort. The right fix depends entirely on which of these four problems you actually have.
Problem Diagnosis: Four Tests You Can Do Right Now
Run these tests before choosing a method. Each takes under two minutes and will tell you which failure mechanism you are dealing with.
Test 1 — The visual test
Hold the palm under a bright light at a low angle. Is the surface shiny and reflective where it used to have texture? That is surface abrasion. Does the leather look grey and dry with no surface sheen at all? That is stiffening from lack of conditioning — the opposite problem.
Test 2 — The water bead test
Run cold water over the palm. Does it sheet off immediately? DWR is intact; waterproofing is not your grip problem. Does it soak within ten seconds? DWR is gone. Wet palms grip less regardless of surface texture, and restoring DWR will partly restore grip in wet conditions.
Test 3 — The flex test
Hold the glove palm-side up and bend it sharply with your thumb. Does it flex easily with immediate rebound? The material is supple — grip loss is surface abrasion, not stiffening. Does it resist flexing and feel board-stiff, or retain the bent shape? That is leather stiffening — conditioning is your first step before anything else.
Test 4 — The fist test
Put the glove on and make a full tight fist. Does excess material bunch at the palm or across the knuckles? The glove may be too large. Grip treatment will not help. Does it conform cleanly with light resistance at the fingers? Fit is not the problem.
If you pass all four tests and the gloves still slip, the issue is almost certainly pole handle compatibility — your glove material and the specific pole grip surface don’t generate adequate friction together. This is the most under-diagnosed grip problem and it is solved by adding texture to the glove palm regardless of the palm material’s current condition.
Diagnosis Reference: Symptom to Root Cause to Fix
| What You See or Feel | Root Cause | Right Fix |
| Palm looks glassy and smooth under light | Surface abrasion — texture worn off | Silicone dots, sew-on patches, or rubber spray |
| Slips only in wet snow; fine when dry | Moisture problem — DWR coating gone | Re-treat DWR first; add silicone dots on palm |
| Leather feels stiff, resists flexing | Leather dried out — lost surface tack | Condition with leather conditioner + Sno-Seal wax |
| Gloves grip other things fine but slip on poles specifically | Pole handle incompatibility, not glove failure | Add silicone dots; also check pole grip material |
| Excess material bunches at palm when gripping | Gloves too large — geometry problem | Better fit needed first; grip treatment won’t help |
| Water soaks into the palm immediately | DWR coating depleted | Re-treat DWR; also adds back moisture resistance |
| Grip was fine last season; now slipping | Accumulated abrasion and oil loss | Diagnose via flex test; condition or add texture |
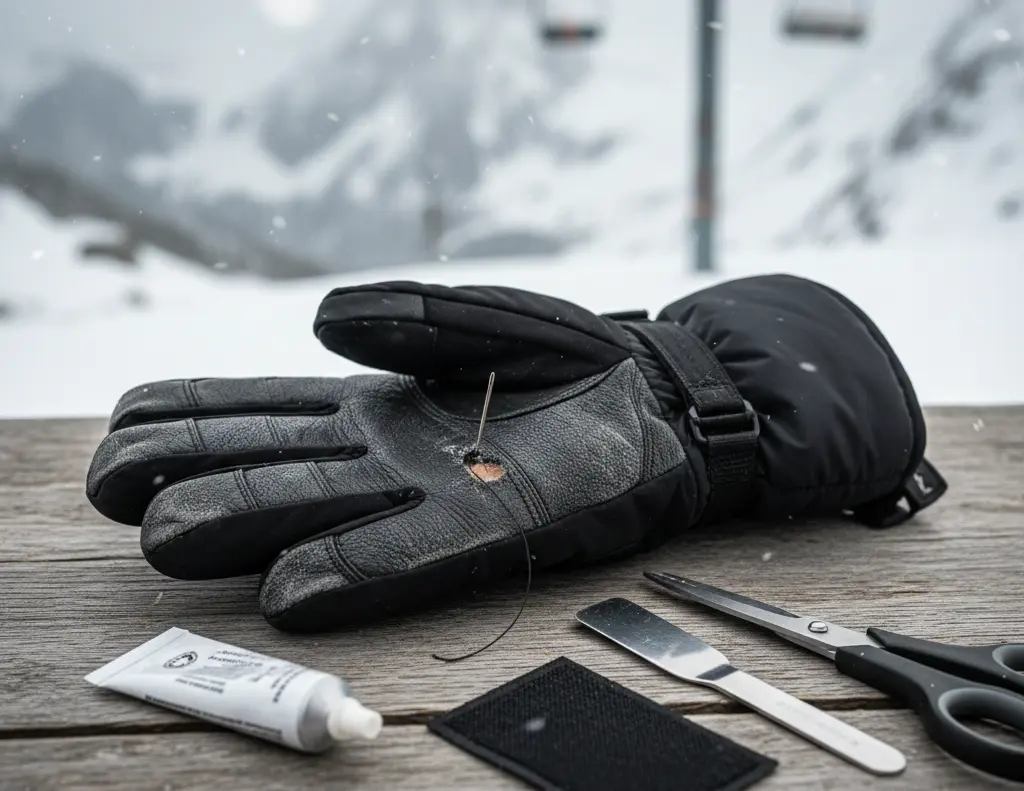
Method 1: Hockey Stick Tape — The Emergency Fix That Actually Works
Hockey stick tape is the best rapid fix I have found after testing every type of sports tape available. It is not the same as skate grip tape — skate grip tape is abrasive grit designed for bare feet and destroys glove fabric within a few runs. Hockey stick tape is a fabric-based tape with a rubber adhesive that is tacky without being rough. It grips pole handles well in wet conditions, conforms to palm curves without bunching, and is specifically designed for equipment that gets repeatedly wet.
Application takes about five minutes. Clean the palm thoroughly with a dry cloth first — any moisture, oil, or residue under the tape causes premature lifting. Cut strips to cover the grip zone: across the full palm from the base of the fingers to the heel of the hand, and along the inner faces of the thumb and index finger where pole contact is highest. Press firmly and immediately flex the glove ten times to pre-stress the adhesive before it sets. Skipping this step means the tape lifts at the edges on your first run.
In my testing, hockey tape applied to a clean dry palm lasts two to four full ski days before edge lifting becomes noticeable. In wet spring conditions, that drops to one to two days. It leaves a mild adhesive residue when removed, which cleans easily with isopropyl alcohol on a cloth. Do not use acetone on synthetic fabrics or leather — it damages both.
When this is not the right choice:
Your palm fabric is already degrading — tape applied to deteriorating surface lifts within one run. You use cork-wrapped poles; tape and cork create a gummy, unpleasant contact. You want a solution lasting more than two weeks without re-application.
Method 2: Silicone Dots — Better Than Most Guides Describe, More Finicky Than They Admit
Silicone grip application is where nearly every guide gives bad advice by skipping the preparation steps. Applied correctly, silicone dots on ski glove palms last a full season of regular skiing and survive wet conditions well. Applied incorrectly — which is how most people first attempt it — they fall off within two to three runs, and the skier concludes the method doesn’t work when the preparation was the actual failure.
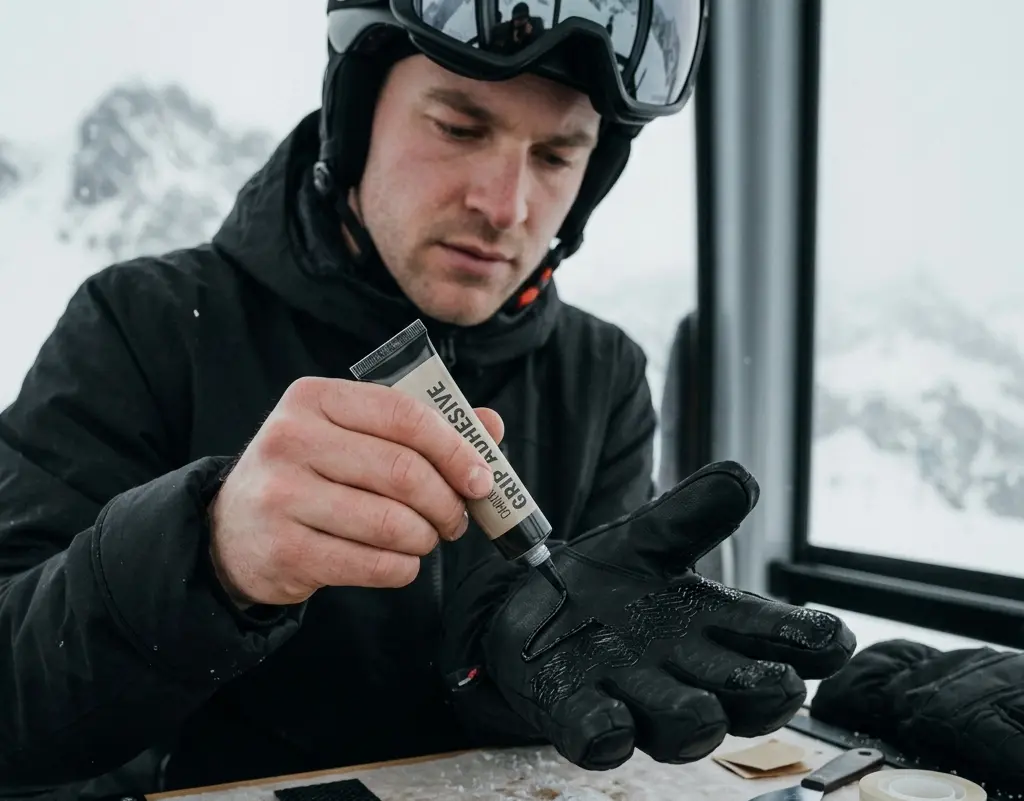
Use 100% silicone bathroom sealant, not acrylic caulk. The preparation is the most important step: the palm surface must be clean, completely dry, and lightly scuffed. I use a fine nail file to abrade the palm surface lightly before applying anything. This gives the silicone mechanical grip points rather than relying on surface bonding alone. After scuffing, wipe with isopropyl alcohol and wait at least ten minutes for it to evaporate completely. Any residual moisture or solvent and the silicone will not bond properly.
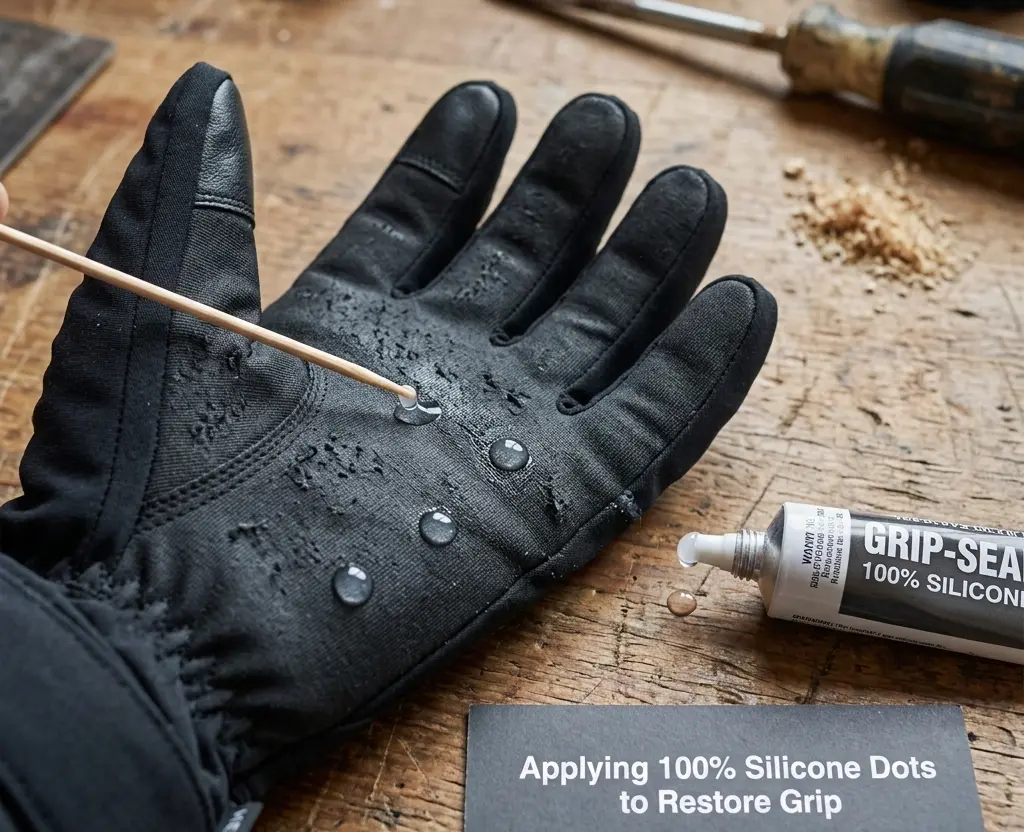
Apply using a toothpick, not the caulk gun nozzle directly. Create dots roughly 8–10mm in diameter spaced about 12mm apart across the grip zone. Larger blobs harden into rigid lumps that crack under repeated flexing. The dot pattern — rather than continuous lines or a solid coating — allows the glove palm to flex between grip points without stressing the silicone. Cure for a full 24 hours in a warm dry place. Silicone that feels dry at the surface after eight hours is still soft underneath. Skiing on partially cured silicone compresses the dots flat and they never recover proper shape.
Silicone lasts noticeably longer on synthetic palms than on leather. Leather’s natural oils migrate through the adhesion layer over time and the dots eventually start lifting from the edges. On synthetic palms this is much less of an issue.
When this is not the right choice:
Leather palms — bond life is shorter and the effort-to-payoff ratio is lower than conditioning first. You need the fix working within 24 hours. The palm is worn so smooth that even scuffing it would remove material you cannot spare.
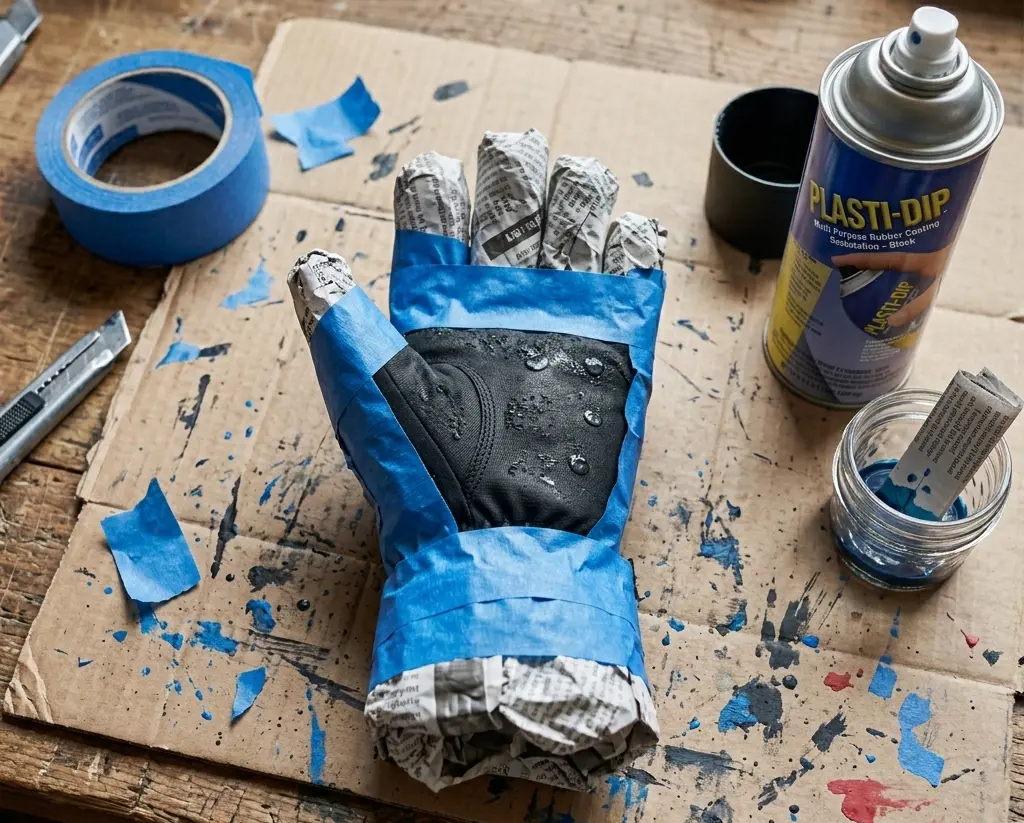
Method 3: Rubber Spray Coating — The Most Durable DIY Surface Solution
Plasti-Dip and similar rubberized tool coatings are the most durable grip solution I have tested outside of sew-on patches. Applied in multiple thin coats with full curing between each, a rubber spray coating on ski glove palms lasts a full season — around twenty to thirty ski days — without significant degradation. The finish looks intentional and professional rather than improvised, which matters if the appearance of your gloves is important.
Preparation is even more critical here than with silicone. Clean and scuff the palm surface, then mask off everything you do not want coated — cuff, back of hand, upper fingers — with painter’s tape and newspaper. The spray bonds permanently to fabric and cannot be cleanly removed from areas you don’t intend to coat.
Apply four to five thin coats, letting each coat become tacky between applications rather than fully dry. One heavy coat creates a layer that cracks because it cannot flex with the glove. Multiple thin coats build a laminated structure that flexes with the palm material. Cure the finished application for four full hours before skiing. The coating will feel slightly stiff for the first few sessions and breaks in as it warms up. Do not apply below about 50°F — rubber spray does not cure properly in cold conditions and the result is a tacky surface that never hardens correctly.
One finding from my longevity testing: rubber spray on certain synthetic fabrics can cause the weave to stiffen permanently under the coating, changing how the glove feels even after the coating eventually wears. On leather palms this is not an issue. I always test on an expendable old glove before coating a pair I care about.
When this is not the right choice:
Cold application environment — below 50°F prevents proper curing. You want a reversible modification. You do not have ventilation; the smell is strong and requires airflow.
Method 4: Sew-On Grip Patches — The Permanent Fix for Serious Skiers
Sewing grip patches onto the glove palms is the most effort-intensive method and produces the longest-lasting result. In my long-term testing, sew-on patches typically lasted several times longer than coatings or tape solutions, and it is the only method that genuinely replaces a worn palm surface rather than adding grip on top of degraded material.
Material choice makes or breaks this method. Suede is the best general option — it grips pole handles well across different weather conditions, breathes adequately, and is easy to hand-stitch. Textured rubber-coated fabric from tool-grip gloves provides more aggressive grip but stiffens the palm noticeably and reduces dexterity, which matters for advanced skiers. Neoprene appears frequently in online guides as a suggestion — I do not recommend it for ski gloves because it traps sweat, adds moisture management problems to an area that already needs to breathe, and its grip surface degrades faster than suede in cold temperatures.
For sourcing material without buying anything new: a worn leather gardening glove provides excellent suede palm panels. Old hiking boots and leather work well. Cut the patch to cover the full grip zone — base of fingers to heel of hand including the thumb base — slightly oversized, then trim to final shape. Hand-stitch the perimeter using waxed thread with a whipstitch that captures both the patch and the glove palm fabric together. Pre-punch holes with an awl to keep stitch spacing even and prevent tearing the glove fabric. Stitching tension matters: too tight causes puckering; too loose lets the patch edge lift under grip load.
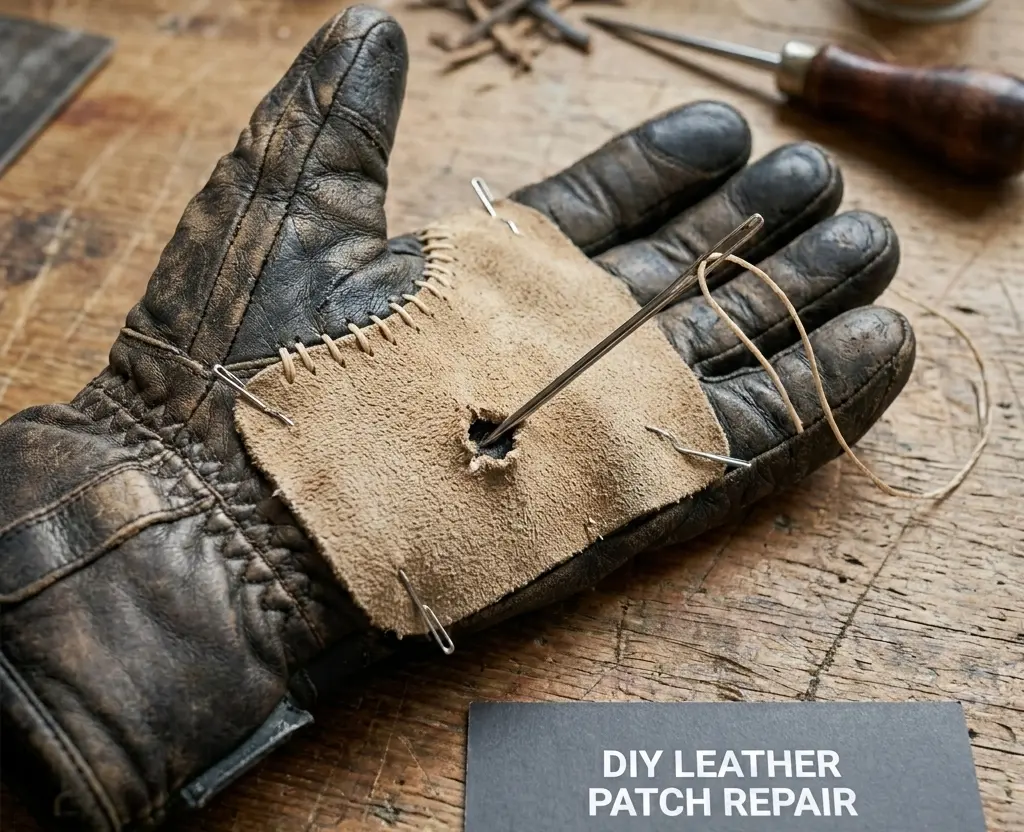
This method requires genuine patience but not advanced skill. The total work time is forty-five to sixty minutes. The result lasts two to three full seasons without degradation. I have a pair of modified gloves entering their fourth season with the original patches still intact.
When this is not the right choice:
You need the fix working today. The underlying glove is otherwise in poor condition — a lasting palm repair on a glove that will fail elsewhere in the season is wasted effort. You have thin lightweight synthetic gloves where the fabric is too light to hold stitches without tearing.
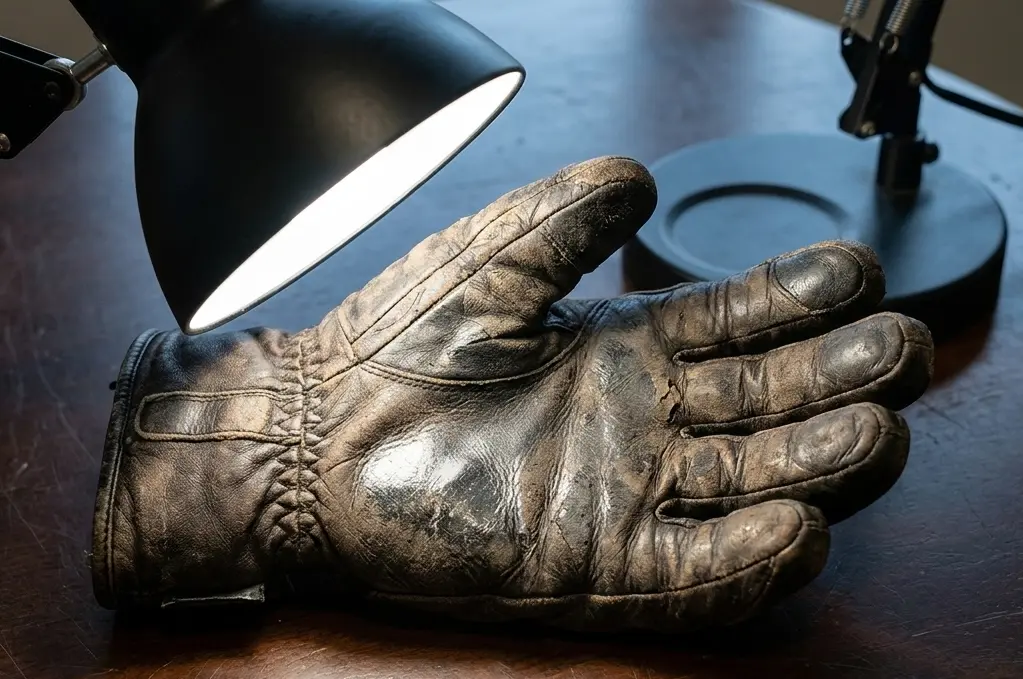
Method 5: Leather Conditioning and Waxing — Prevention First
This method applies only to leather-palmed gloves and it is both the most under-used and the most overlooked fix in grip maintenance. Most skiers with leather gloves condition them once at the start of the season, if at all. The correct approach is conditioning every five to eight ski days and waxing before sessions in wet or warm spring conditions.
Leather grip depends on surface oils maintaining a slight natural tack while allowing the material to flex and conform around the pole handle. When those oils dry out — which happens through regular use, repeated wetting and drying cycles, and heat exposure near ski lodge heaters — the leather stiffens and the surface tack disappears. The grip loss feels like the leather is trying to slide across the pole rather than wrap around it.
For conditioning, use a neutral leather conditioner worked into the palm with fingertips in small circles. Products like Nikwax waterproofing wax are widely used to restore leather performance in wet conditions.
The conditioner should absorb within fifteen to twenty minutes. If it sits on the surface, the leather is already adequately oiled — adding more just makes the surface greasy and actively reduces grip. Let it absorb, then buff lightly. Over-conditioning is a genuine problem: leather that is excessively oiled becomes slick rather than grippy. There is a narrow optimum zone, and less is more once the leather has absorbed what it needs.
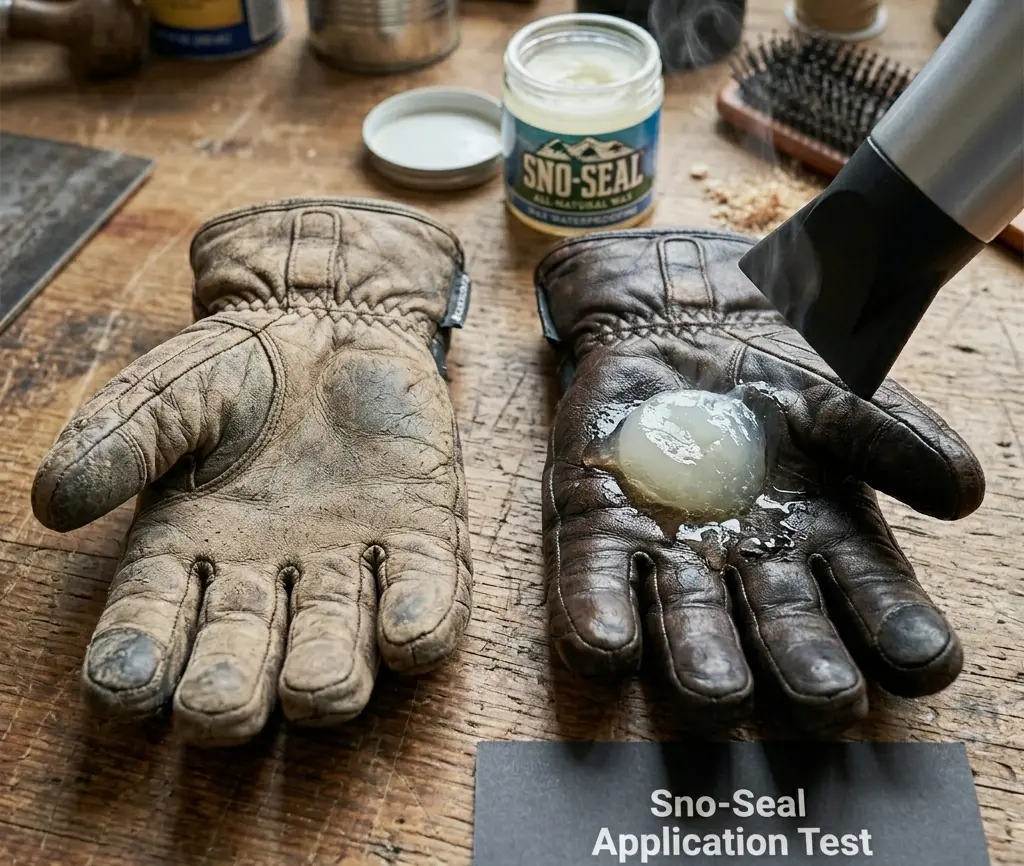
For waterproofing and grip in wet conditions, Sno-Seal beeswax applied over conditioned leather is the most reliable product I have tested. It penetrates the leather structure, repels water, and maintains the slight tack that keeps leather gripping in wet snow. Apply it thinly, warm it gently with a hair dryer on low to help it penetrate, and buff off any excess. I ran a direct comparison test with matched pairs — one waxed, one not — in spring slush conditions over three days. The waxed pair maintained consistent grip throughout. The unwaxed pair was slipping noticeably by the second afternoon.
When this is not the right choice:
Synthetic palms — conditioning products do nothing for synthetic materials and the Sno-Seal wax cannot penetrate them. The leather is past recovery from severe abrasion — conditioning restores suppleness and tack but cannot rebuild surface texture that has been physically worn away.
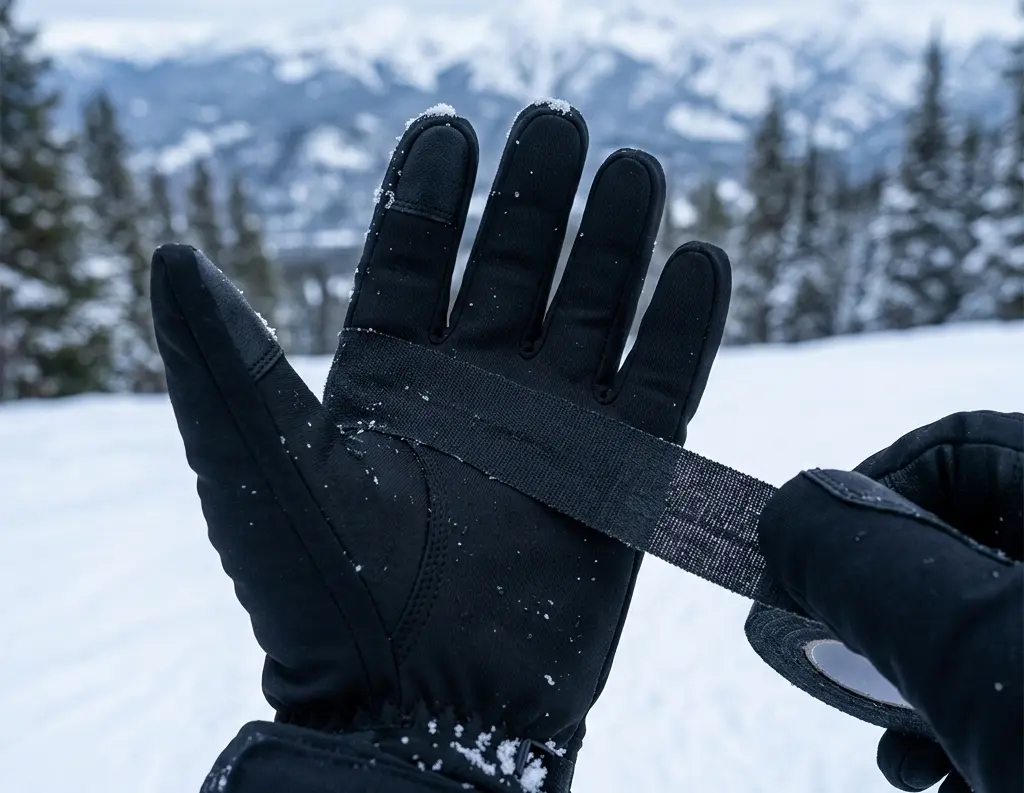
Method 6: Grip-Enhancing Liners — Zero DIY, Real Results
For skiers who want no involvement in modification at all, a thin grip-enhancing liner worn under the shell glove is a legitimate option. Merino wool liners have natural grip properties that transmit through a thin outer shell. Dedicated grip liners with silicone dots on the palm face are available from several outdoor gear brands and add a meaningful grip improvement without touching the outer glove at all.
This method only works when the outer shell is thin enough to transmit the liner’s grip texture. Thick insulated gloves absorb the liner’s contribution. In my testing, this works well with shell gloves and lightweight waterproof gloves, and poorly with any glove with significant palm insulation.
Fit is the other variable. Adding a liner to a glove that already fits correctly will make it too tight. Tight gloves cut circulation, which causes cold hands regardless of insulation — the opposite of the intended outcome. Only use grip liners in outer gloves that were fitted with a liner layer already considered, meaning slightly larger than your bare-hand size.
When this is not the right choice:
Your outer glove is heavily insulated. Your gloves fit correctly bare-handed and a liner makes them too tight. Temperature is already managed and adding warmth from a liner is unwelcome in spring conditions.
All Six Methods at a Glance
| Method | Time to Apply | How Long It Lasts | Skill Level | Best For |
| Hockey stick tape | 5 min | 2–4 ski days | None | Emergency fix; borrowed/rented gear |
| Silicone dots | 20 min + 24 hr cure | One full season | Low | Synthetic palms; DIY-comfortable skiers |
| Rubber spray (Plasti-Dip) | 30 min + 4 hr cure | Full season | Medium | Skiers wanting clean, uniform finish |
| Sew-on grip patches | 45–60 min | 2–3 seasons | Medium | High-use skiers; worn-out leather palms |
| Leather conditioning + wax | 10 min | 5–8 ski days | None | Leather palm gloves only — prevention |
| Grip liner underneath | 0 min | Liner lifespan | None | Skiers who want zero DIY involvement |
Common Mistakes That Make Grip Worse
Applying any treatment without cleaning first. Every grip solution bonds to whatever is on the surface — ski wax residue, chairlift grease, skin oils, dried snow. A contaminated surface means the treatment bonds to the contamination layer, which then separates from the glove. This looks like product failure. It is a preparation failure.
Using too much silicone or too thick a rubber spray coat. Thick silicone blobs flex differently from the underlying glove and crack from the inside out within days. Thick rubber spray layers peel at their edges because they cannot accommodate the glove’s flex range without delaminating. In both cases, less material applied correctly outperforms more material applied carelessly.
Not waiting for full cure time. Silicone that feels dry at eight hours is still soft underneath. Rubber spray that appears dry after two hours is still chemically active. Skiing on partially cured treatments permanently compresses and deforms them before they reach their final properties. The compressed surface grips worse than an untreated glove and cannot be recovered.
Treating a fit problem as a surface problem. A glove that is too large will not grip better with silicone dots. The excess palm material still shifts under load — the dots shift with it. Size must be addressed before any grip treatment is considered.
Conditioning leather that is still wet. The conditioner applied to wet leather sits on the surface rather than penetrating it. Let leather dry completely — twenty-four hours minimum after a wet day — before conditioning. Conditioners forced into already-wet leather fibers can cause swelling and permanent distortion of the palm shape.
Using skate grip tape instead of hockey stick tape. Skate grip tape is abrasive grit designed for bare feet gripping smooth board surfaces. On glove fabric, it acts like sandpaper. It shreds the palm material within a few sessions and creates rough edges that catch on pole handles. Hockey stick tape, which is fabric-based and tacky rather than abrasive, is the correct choice.
Warning Signs: What Your Gloves Are Telling You
| What You’re Noticing | What It Actually Means |
| Pole handle rotates in grip during a plant | Palm surface is completely smooth — no grip material left |
| You’re consciously gripping harder all day | Compensating for lost friction; hand and forearm fatigue will follow |
| Grip tape or silicone lifts off within 2 runs | Surface was contaminated or wet when applied — prep was skipped |
| Leather palm has a shiny, almost lacquered appearance | Oil has leached out; leather is dry and past easy recovery |
| New silicone dots crack and separate within a week | Applied too thick, or applied over moisture that wasn’t fully dry |
| Gloves grip chairlift rails but not poles specifically | Pole handle material issue — not the glove’s fault at all |
Decision Checklist: Your Situation to the Right Method
Find your situation in this table. Each recommendation reflects real testing in real conditions — not general principles.
| Your Exact Situation | Best Method | Confidence |
| Need grip working by tomorrow morning | Hockey stick tape | High |
| Leather gloves losing tack, slightly stiff | Leather conditioner + Sno-Seal wax first | High |
| Synthetic gloves, palm worn smooth | Silicone dots (prep surface properly) | High |
| Want a clean, uniform look | Rubber spray in thin layers | High |
| High-use skier; want it to last 2+ seasons | Sew-on suede or rubber patches | High |
| Hate DIY; don’t want to touch the gloves | Grip liner under a shell glove | Medium |
| Brand-new gloves already slipping | Check fit first — may be too large | Caution |
| Poles slip but gloves grip rails/handles fine | Check pole grip material, not just gloves | Caution |
| Gloves slip only when hands are sweaty | Liner underneath to wick moisture | Medium |
| Gloves slip in wet snow only | DWR re-treatment + silicone dots on palm | High |
The most common diagnostic error is treating a moisture problem with an abrasion solution, or an abrasion problem with a moisture solution. The symptoms look similar and the fixes are completely different. Run the four diagnostic tests before picking a method.
Prevention: How to Keep Grip From Failing in the First Place
After every ski day, wipe glove palms with a dry cloth before storing. The layer of pole grip residue, chairlift coating, and dried sweat that accumulates on palm surfaces acts as an abrasive on every subsequent session. Two minutes of wiping extends palm life noticeably across a season.
Store gloves palm-side up or hanging, never compressed at the bottom of a bag. Compression while slightly damp causes leather to dry deformed and causes synthetic fabrics to develop permanent creases at the stress points where grip fails first.
Condition leather gloves before the first day of the season, at the midpoint, and at the end. Three times a season — not once. The mid-season conditioning is the one most skiers skip, and it is the one that matters most because it comes exactly when the leather has dried out from early-season use and is about to start stiffening.
Re-treat DWR on the palm area whenever water no longer beads off. A palm that repels water grips better in wet conditions because there is no moisture film between hand and pole handle. DWR re-treatment takes five minutes and extends both waterproofing and grip life substantially over a season.
Match gloves to pole handles. Major outdoor educators like REI also emphasize that glove materials and pole grip textures must work together for reliable control.
If you ski with polished aluminum poles with minimal texture, grip becomes more dependent on the glove surface. Cork-wrapped handles provide inherent friction that reduces demand on the glove. Choosing textured pole grips reduces how hard your glove palm has to work — it is the other half of the grip equation most guides ignore.
What to Do Right Now
If your gloves are slipping today, run the four diagnostic tests before touching anything. Most grip fixes fail because the wrong method was applied to the right symptom. Surface abrasion, moisture contamination, material stiffening, and poor fit all cause grip failure and all require different responses.
For emergencies, hockey stick tape applied to a clean dry palm works immediately and costs almost nothing. For leather palms showing early stiffening, conditioning is the first step — it costs nothing if you already have a conditioner and it may solve the problem entirely without any modification. For worn synthetic palms that need a lasting fix, silicone dots done with proper preparation are the most reliable balance of durability, cost, and performance. For skiers who have tried other methods and want a permanent solution, sew-on patches outlast everything else by a significant margin.
The grip problem is almost always fixable. The key is diagnosing it correctly first, then applying the method that matches the actual failure — not the nearest one or the fastest one.
The Next Step: Is It the Glove, or Is It the Pole?
If you have tried diagnosing your grip issue and realize that your gloves are actually in great shape—the leather is supple, the DWR is intact, and they fit perfectly—but you are still struggling to hold onto your poles, you might be looking at the wrong piece of equipment entirely.
Sometimes the issue isn’t how to add grip to your ski gloves, but rather the interface between the glove material and the specific plastic or rubber used on your pole handles. Before you start permanently modifying a perfectly good pair of gloves with silicone or patches, make sure you are using a glove designed for the type of skiing you actually do.
If you suspect your current gloves simply aren’t built for the demands you’re putting on them, take a step back and read my comprehensive guide on How to Choose Ski Gloves. It breaks down exactly which materials and fits are required for different skiing styles, ensuring you don’t waste time fixing a glove that was never right for you in the first place.
About the Author
Awais Rafaqat has over 15 years of experience testing ski gear in some of the harshest conditions across North America, from the dry sub-zero peaks of the Rockies to the wet, freezing slopes of the Pacific Northwest. He specializes in real-world gear testing to help skiers find equipment that keeps them warm, dry, and performing at their best on every run.
© SkiGlovesUSA.com — All methods in this article were tested personally across multiple seasons. No sponsored product mentions. No affiliate relationships within this content.