
There is a distinct, sinking feeling every skier knows. You are on the chairlift, the wind is howling at 20 mph, and you feel a sharp jet of freezing air hitting your thumb. You look down and see it: the seam has blown out.
In my 15 years of skiing—from the icy slopes of Vermont to the deep powder of Hokkaido—I have seen hundreds of skiers throw away expensive gloves because of minor tears. I’ve seen people trash $160 Hestra Heli mitts because of a one-inch seam failure.
Here is the reality: A torn glove does not mean the gear is dead.
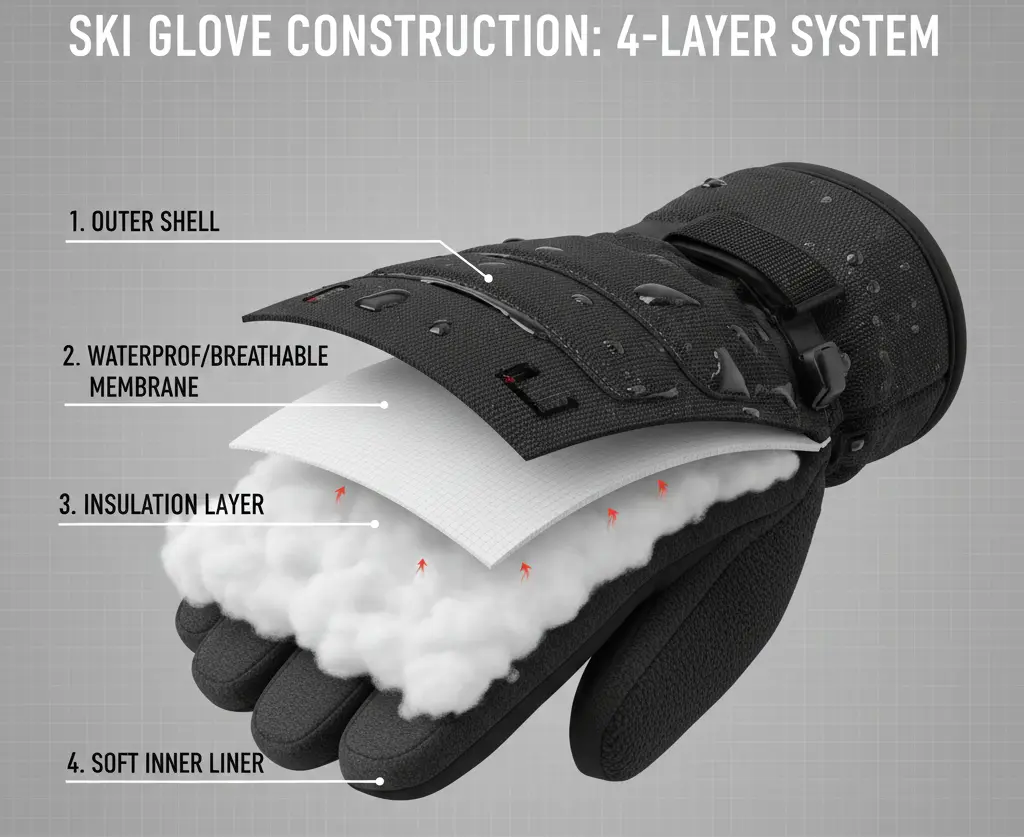
However, repairing a ski glove is not like darning a sock or fixing a t-shirt. You are working with a complex piece of engineering. A ski glove is a “sandwich” of three to four distinct layers: the durable outer shell, the delicate waterproof membrane (like Gore-Tex), the lofted insulation, and the moisture-wicking liner.
If you just grab a needle and stitch through all four layers, you will ruin the glove. You will puncture the waterproof bag, turning your hand into a sponge, and you will compress the insulation, creating a permanent “cold bridge.” Mastering how to sew ski gloves requires more than a needle and thread; it demands a specific technique to keep these layers functional and your fingers dry.
This guide is not a generic craft tutorial. It is a technical walkthrough on how to perform a structural repair that maintains the warmth, dexterity, and waterproofing of your gear.
Quick Repair Summary
If you are in a rush or currently sitting in a ski lodge, use this table to decide your next move.
| If the damage is… | The Best Fix | Skill Level |
| Clean Seam Pop | Ladder Stitch (keeps thread inside) | Beginner |
| Edge Cut (< 2 inches) | Whip Stitch + Seam Seal | Beginner |
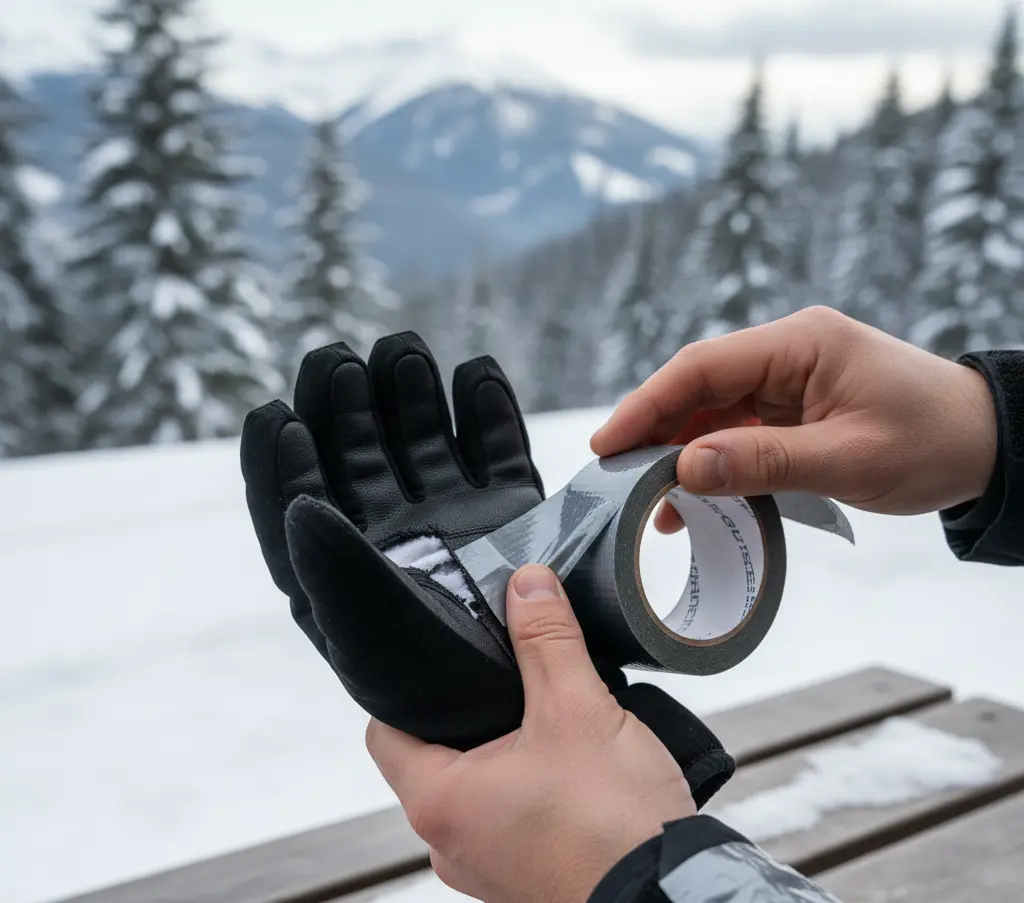
| Frayed Nylon/Softshell | Singe edges + Tenacious Tape | Intermediate |
| High-Stress Palm Rip | Double Stitch + Leather Patch | Intermediate |
| Dry/Cracked Leather | None. Replace the glove. | N/A |
| Heated Glove Tear | Stop. Send it to the manufacturer. | N/A |
Phase 1: The Anatomy of a Failure (Know Before You Sew)
Before you fix anything, you must understand what you are cutting into. If you sew blindly, you risk puncturing the one layer that keeps you dry.
- The Shell (Leather/Nylon): This is your armor. It handles abrasion and wind. This is usually where the repair happens.
- The Membrane (The “Do Not Touch” Zone): Sitting just inside the shell is a thin, white, plastic-like bag (Gore-Tex, eVent, etc.). If you pierce this with your needle, your glove is no longer waterproof.
- The Insulation: Synthetic fibers or down. If you sew this tight against the shell, it loses its “loft” (air fluffiness) and stops holding heat.
- The Liner: The fleece touching your skin.
My Personal Rule: The goal of every repair is to stitch the Shell Only, floating the needle over the membrane without piercing it.
Phase 2: The Decision Matrix — Repair or Retire?
I have tried to save gloves that were past their prime, and it’s usually a waste of time. Use this checklist to decide if you should proceed.
Green Light: Fix It
- The “Clean Pop”: The most common failure. The thread has snapped, but the leather or fabric on either side is intact. This is a 100% fixable issue.
- Edge Cuts: Sharp cuts from ski edges (under 2 inches) on the back of the hand.
- Cuff Separations: Where the gauntlet meets the wrist elastic. This is low-risk because there is usually no waterproofing here.
Red Light: Trash It
- Dry Rot / Cracking: Pinch the leather next to the tear. Does it have tiny micro-cracks? If so, the leather has lost its oils. Your new stitches will just rip through the leather like a knife through butter.
- The “Palm Cheese-Grater”: If the palm material is worn so thin that it looks fuzzy or you can see the white insulation underneath, the structural integrity is gone. A patch won’t hold tension.
- Internal Flooding: If your hands get wet on a snowy day without any visible holes in the shell, the internal membrane has shattered. You cannot fix this with a needle.
- If your glove is over 5 years old and insulation is flat, replacement is smarter than repair.
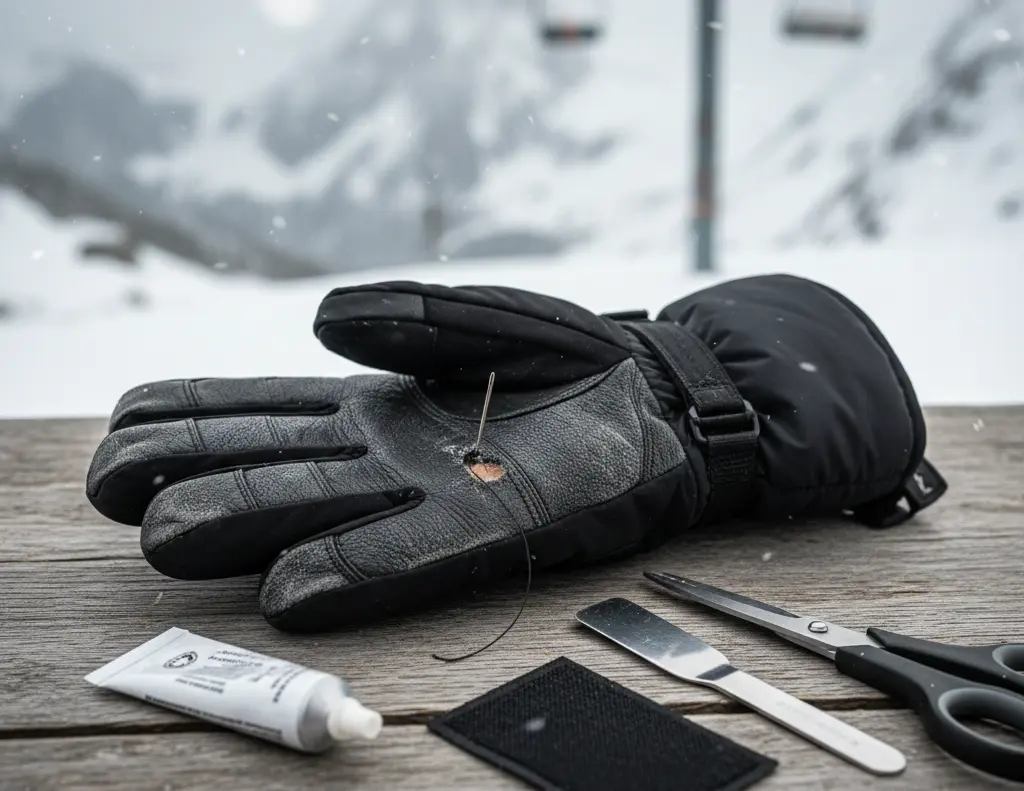
Phase 3: The Toolkit (Cotton Kills)
The biggest mistake beginners make is grabbing a standard hotel sewing kit. Cotton thread rots when wet. If you use cotton thread on a ski glove, the repair will snap within three days of exposure to snow and melting ice.
Here is the exact kit I carry in my repair bag:
| Tool | What to Buy | Why? |
| The Thread | Bonded Nylon (Size #69) or Polyester Upholstery Thread | Nylon stretches slightly with your hand and resists rot. “Bonded” means it won’t fray against sharp ski edges. |
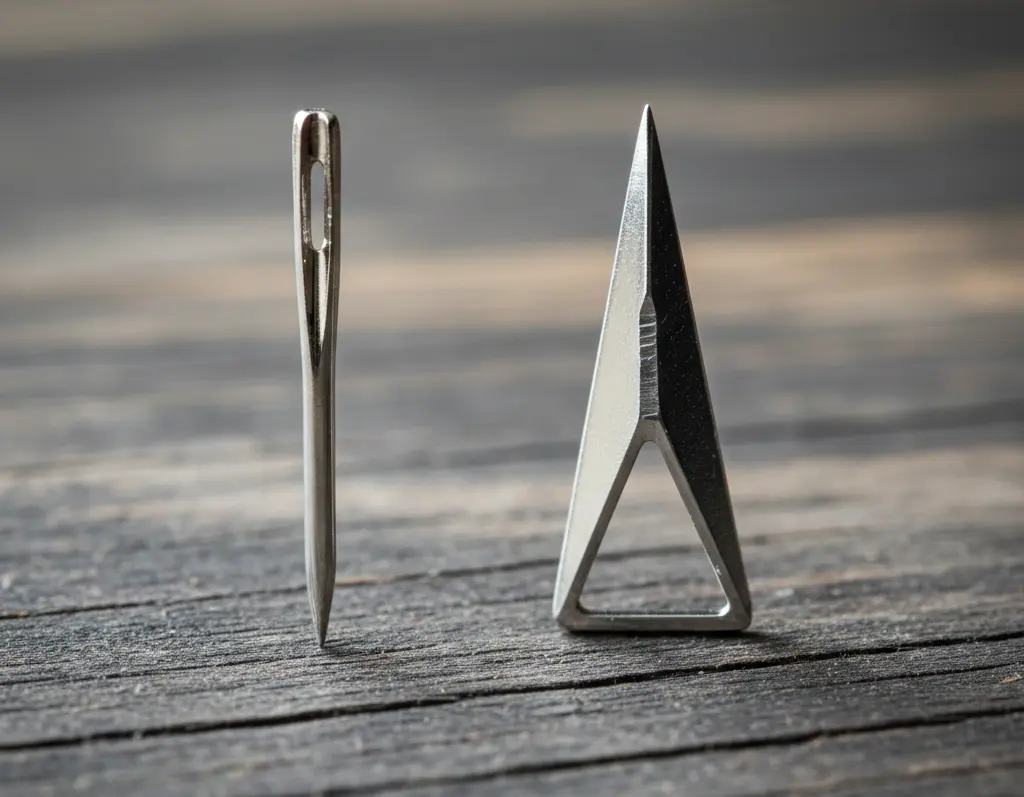
| The Needle | Glover’s Needle (Leather Needle) | These have a triangular, razor-sharp tip that cuts a hole. A standard round needle requires too much force and will break. |
| The Grip | Metal Thimble | You cannot push a needle through heavy goat leather with your bare thumb. You will hurt yourself. |
| The Sealant | Gear Aid Seam Grip +WP | This is a urethane glue that stays flexible in freezing temps. Super glue cracks; this stuff bends. |
| Emergency | Dental Floss (Waxed) | If you are in a hotel room with zero tools, waxed dental floss is stronger than cheap thread and inherently waterproof. |
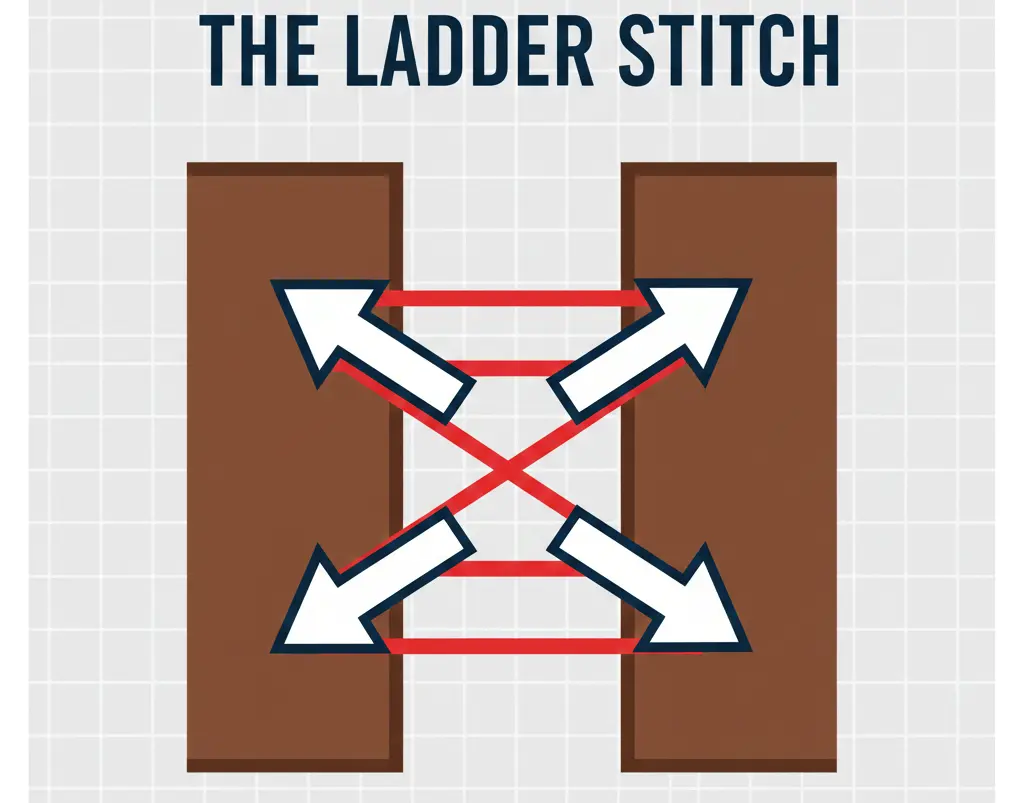
Phase 4: The “Ladder Stitch” Method (Step-by-Step)
This is the technique used by cobblers and gear repair shops. We avoid the simple “whip stitch” (looping over the edge) because the thread sits on top of the leather, where it will scrape against ski poles and snap again.
We want a Blind Stitch (Ladder Stitch) where the thread hides inside the seam.
Step 1: The Prep
Dry the glove completely. Sewing wet leather traps moisture, leading to rot and mold inside the insulation layers. Clean the area with a damp cloth to remove salt and dirt, which act like sandpaper on your new thread.
Step 2: The Anchor
Turn the glove inside out? No. You usually can’t turn a ski glove inside out because of the liner. You must work from the outside.
Start your stitch about 0.5 cm before the tear begins, in the “healthy” existing seam. Tie a knot at the end of your thread, insert the needle into the old needle hole, and anchor it deeply.
Step 3: The Ladder Stitch
Imagine you are lacing a shoe, but from the inside of the fabric.
- Insert the needle into the inside fold of the right side of the tear. (Do not go all the way through to the liner! Just catch the leather).
- Run the needle inside the fold for about 3mm, then push it out.
- Cross directly over to the left side. Insert into the inside fold.
- Run it for 3mm, push it out.
- Repeat.
The Magic Moment: After 4-5 stitches, pull the thread tight. The two sides of the leather will slide together, closing the gap perfectly, and the thread will disappear inside the seam.
Step 4: The Tension Check
Don’t strangle the glove. Tighten the thread firmly to close the hole, but leave a tiny fraction of “give.” Your hand expands when you grip a ski pole. If the seam is too tight, it will burst under pressure.
Step 5: The “Double Back” (For Thumbs)
If you are repairing the thumb crotch (the high-stress area between thumb and index finger), one pass is not enough. Once you reach the end of the tear, turn around and sew back the other way using the same holes. This doubles the strength.
Common Mistakes Beginners Make (And How to Avoid Them)
Most failed repairs don’t happen because of poor stitching; they happen because the person didn’t account for the physics of a ski glove. Avoid these four common errors:
- Using Cotton Thread: This is the most frequent mistake. Cotton thread is weak, absorbs moisture, and eventually rots. In freezing temperatures, wet cotton thread can actually snap just from the tension of you clenching your fist. Always use bonded nylon or polyester.
- The “Through-and-Through” Stitch: Beginners often sew through the shell, the insulation, and the liner all at once. This “quilts” the layers together, which removes the air space needed for warmth and creates a permanent leak in the waterproof membrane. Only stitch the outer shell.
- Stitching Too Tight: It’s tempting to pull the thread as tight as possible to ensure a “strong” seal. However, leather and technical fabrics need to move. If the seam has no “give,” the tension will cause the fabric to tear right next to your new stitches the first time you grip your ski poles.
- Ignoring the Knot: If you leave your knot on the outside of the glove, it will rub against your pole straps or lift bars and unravel within hours. Always bury your anchor knot inside the shell or under a seam fold.
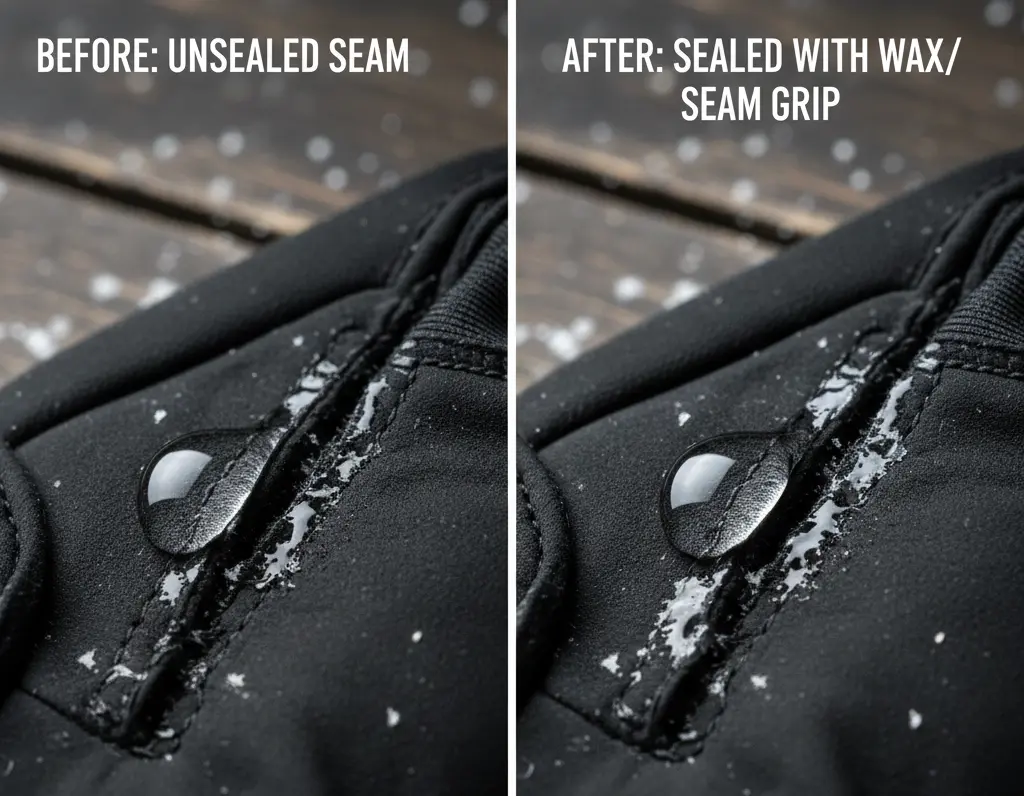
Phase 5: Waterproofing (The Critical Step)
You just poked 50 tiny holes in your waterproof glove. If you don’t seal them, water will wick right down the thread and into the insulation.
- For Leather: Take a small amount of Sno-Seal or beeswax. Rub it vigorously over the new seam. Use a hair dryer on low heat to melt the wax so it penetrates the needle holes.
- For Nylon/Synthetics: Apply a thin bead of Seam Grip. Let it cure overnight (12 hours). Do not ski with it until it is fully dry, or it will stick to your poles.
Special Scenarios: Nylon vs. Leather
Repairing Nylon / Softshell (The “Fray” Factor)
Nylon is annoying because it frays. If you cut it, it unravels.
- The Trick: Before sewing, take a lighter and gently singe the loose threads of the tear. This melts the plastic fibers and stops the fraying.
- Reinforcement: If the nylon is thin, I recommend applying a piece of Tenacious Tape over the tear first, then sewing through the tape. The tape acts as a scaffold to hold the stitches.
Repairing Leather (The “Pre-Hole” Factor)
If the leather is very thick (like on work-style Kinco gloves):
- The Trick: Don’t force the needle. Use a small awl or a thumbtack to pre-punch your stitch holes. It makes the sewing process 50% faster and saves your fingers.
Real-World Case Study: My Hestra Heli Repair
Two years ago, I sliced the index finger of my Hestra gloves on a sharp ski edge. The cut was vertical, right through the leather, about 1 inch long.
- What I did: I used dental floss (mint waxed) because I was in a hut trip with no kit. I used a whip stitch because I couldn’t do a ladder stitch on the flat leather.
- The Result: It held for the rest of the trip (4 days).
- The Follow-up: When I got home, I removed the floss. I cut a small oval of scrap leather from an old wallet. I glued the patch over the cut using Aquaseal, then sewed around the perimeter of the patch. Those gloves are still my primary pair today.
Decision Checklist: The “Should I Sew?” Test
Run this check before you start.
- Can you pinch the fabric together without forcing it?
- Yes: Proceed.
- No (Too much gap): You need a patch, not just a stitch.
- Is the liner stuck to the shell?
- Yes: Be extremely careful. Pull them apart with tweezers if possible.
- No: Good. Stitch away.
- Do you have synthetic thread?
- Yes: Go for it.
- No (Cotton only): Stop. Wait until you can buy polyester/nylon.
- Is this a heated glove?
- Yes: STOP. See warning below.
When This Is NOT The Right Choice (Safety Warnings)
1. Heated Gloves
If you have battery-powered gloves (like Lenz or Therm-ic), the heating elements run through the fingers. Do not sew these yourself. If you accidentally pierce a wire with your needle, you risk a short circuit. Best case: the glove stops working. Worst case: the battery overheats or burns your skin. Send these to the manufacturer for warranty repair.
2. High-Consequence Environments
If you are planning a trip to Denali, Antarctica, or a deep backcountry traverse, do not rely on a home-repaired glove. The risk of the repair failing in -40°F weather is not worth the $150 savings. Buy a new pair for the expedition; keep the repaired ones for resort training days.
Quick Problem Diagnosis
- Problem:My fingers are cold specifically at the repair spot.
- Diagnosis: You sewed through the insulation and compressed it, removing the air pocket.
- Fix: Pick the stitches out. Redo it, ensuring you lift the leather away from the white fluff before passing the needle.
- Problem:The repair leaks water immediately.
- Diagnosis: You pierced the internal membrane.
- Fix: Apply a heavy layer of Seam Grip to the outside of the glove to create a waterproof cap. It’s ugly, but it works.
- Problem:The leather tore again right next to the stitches.
- Diagnosis: The leather was dry-rotted, or your stitches were too close to the edge.
- Fix: You need a patch. You cannot stitch rot.
Maintenance: Prevent the Tear
The best repair is the one you don’t have to make.
- Oil Your Gloves: Leather is skin. If it gets dry, it cracks. Apply leather balm (Hestra Balm or similar) at the start and end of every season.
- Watch Your Edges: 90% of cuts happen when carrying skis over your shoulder. Hold your skis with the bases touching so the sharp metal edges face in, not out against your gloves.
Repairing your own gear is a badge of honor. It shows you use your equipment hard and respect its value. A glove with a scar on it has a story—just make sure it’s a story about a great repair, not a frozen finger.
Final Thoughts: The Badge of Honor
There is a specific satisfaction in looking down at a scar on your glove while riding the lift. It proves you didn’t just buy your way out of a problem—you solved it with your own hands. That stitched seam, if done correctly, is often stronger than the factory original.
However, be realistic about your gear’s lifespan. A repair buys you time, and it keeps perfectly good leather out of the landfill, but it cannot bring dead insulation back to life. If your gloves are “packed out” (thin), or if you are constantly fighting numb fingers despite your best sewing efforts, the issue isn’t the tear—it’s the thermal breakdown of the glove itself.
What To Do If The Repair Isn’t Enough
If you’ve stitched your gloves but still feel the bite of the cold, or if you realized during the “Decision Checklist” that your current pair is beyond saving, it is time to demote them to “spring skiing” duty and invest in a dedicated tool for deep winter.
Don’t just buy the most expensive pair on the rack. Read our field-tested breakdown of the Best Warmest Ski Gloves for Extreme Cold to understand which materials—from heated elements to expedition down—will actually solve your circulation problems for good.
About the Author
Awais Rafaqat has over 15 years of experience testing ski gear in some of the harshest conditions across North America, from the dry sub-zero peaks of the Rockies to the wet, freezing slopes of the Pacific Northwest. He specializes in real-world gear testing to help skiers find equipment that keeps them warm, dry, and performing at their best on every run.