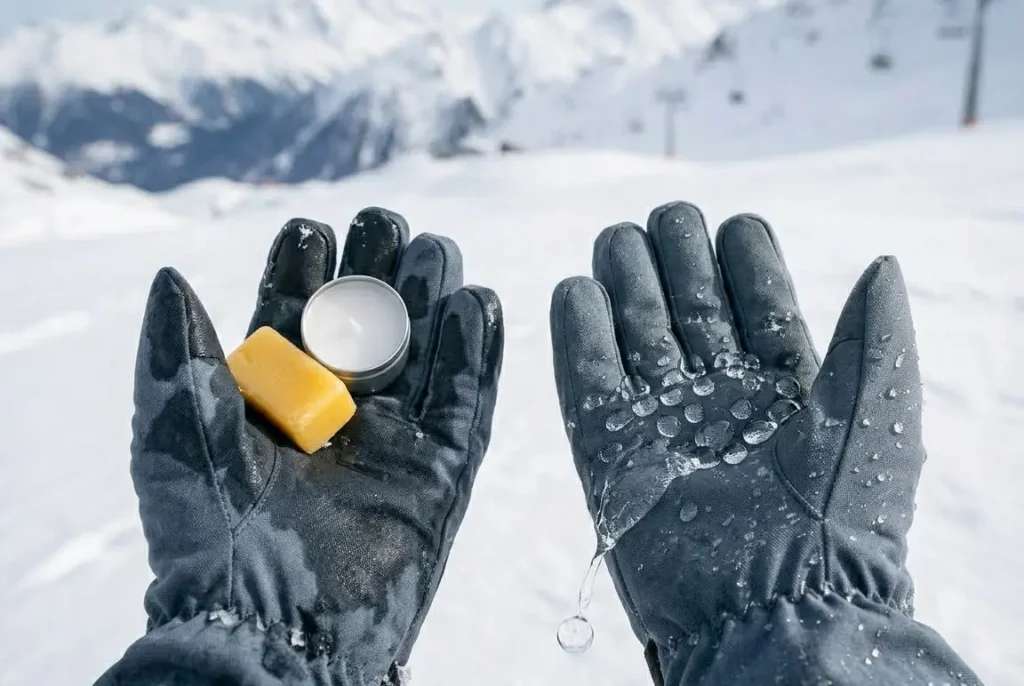
Yes — rubbing a plain wax candle onto the outer shell of your ski gloves and melting it in with a hair dryer creates a practical water-repellent barrier that performs similarly to a basic DWR coating. It works on the same principle as any DWR coating: wax fills the microscopic gaps in fabric and leather, causing water to bead off the surface instead of soaking in. To waterproof ski gloves with a wax candle, you rub the candle firmly across the dry glove surface, heat the wax with a hair dryer until it soaks in and disappears, then let it cool and test it.
The whole process takes about fifteen minutes per pair. In most conditions, the result lasts between 3 to 7 ski days depending on snow type and usage.
What this method does and does not do matters. It restores surface water repellency on the outer shell. It does not fix a failed waterproof membrane inside the glove. If your gloves are leaking because the membrane has broken down, wax on the outside will not stop water from getting in through that layer. This guide covers exactly that — how to waterproof ski gloves with wax candle, when the method works, when it does not, and what real results look like.
Why Candle Wax Repels Water
The outer fabric of ski gloves is treated at the factory with a DWR coating — a chemical layer that causes water to bead off rather than soak into the fibres. That coating wears off over time. When it goes, water soaks into the outer fabric layer, which feels wet and cold even if the waterproof membrane behind it is still intact.
Candle wax fills in where the DWR coating has worn away. The wax molecules bond with the fabric fibres and create a hydrophobic surface — water cannot cling to it, so it beads up and rolls off. This is the same surface-level principle used in water-repellent textile treatments, where reducing surface energy prevents water absorption. Heat is what makes the wax bond properly. Without it, the wax just sits on top of the surface and flakes off within a run or two.
Paraffin wax from a standard unscented candle works well on synthetic and fabric shells. Beeswax works better on leather because it also conditions the leather as it waterproofs it, helping the material stay supple. Both produce the same surface result on synthetic materials.
The wax method restores the outer shell’s water repellency. If water is reaching the inside of your glove, check whether the issue is the outer shell or the membrane behind it. Press the exterior after a wet session — if the outer fabric is soaked through, the DWR is gone and wax will help. If the outside is dry but the inside is damp, the membrane has failed and wax will not fix it.
What You Need — Keep It Simple
You don’t need anything specialized for this — just a few basic items. One plain unscented candle — paraffin or beeswax, any hardware or grocery store candle works. A hair dryer set to medium heat. A clean dry cloth for buffing. That is it.

The candle must be unscented. Scented candles contain oils and additives that leave residue on the glove surface, interfere with the wax bonding, and produce a smell that gets stronger when wet. Paraffin candles are white or cream-coloured and found in every grocery and hardware store. Beeswax candles are yellow and available at outdoor or craft stores.
The gloves must be clean and completely dry before you start. Wax applied over damp fabric or dirt does not bond properly. If the gloves are dirty, wipe them down with a damp cloth and let them dry fully — ideally overnight. Any moisture or grit between the wax and the fabric prevents proper adhesion.
How This Compares to Store-Bought Waterproofing Sprays
Wax is a manual alternative to spray-on DWR treatments. The main difference is durability and control. Wax penetrates deeper into the fabric when heat is applied, which makes it last longer in high-contact zones like fingertips and palms. Sprays are faster to apply and more even across large surfaces but tend to wear off quicker in wet snow conditions. For occasional maintenance, wax is often more effective. For quick reapplication across an entire glove, sprays are more convenient.
How to Waterproof Ski Gloves With Wax Candle — Step by Step
Step 1 — Confirm the gloves are clean and dry
Wax over damp fabric will not bond and will flake off within one session. Any dirt or salt residue creates a barrier between wax and fibre. Wipe gloves with a dry cloth and feel every zone — palm, fingertips, seams — before starting.
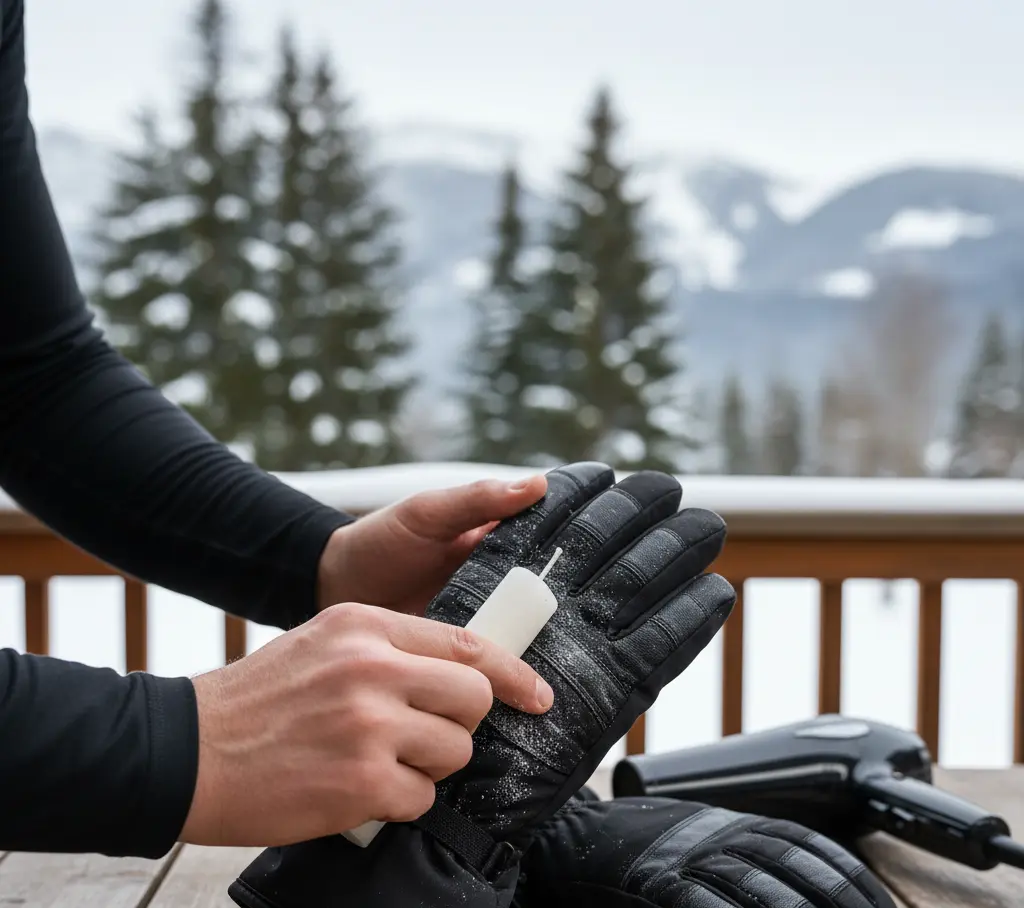
Step 2 — Rub the wax candle firmly across the entire outer surface
Hold the candle like a marker and press it into the fabric with firm pressure. Work in overlapping strokes. You should see a white or cream-coloured coating building up on the surface — that is the wax transferring. Cover the back of the hand, palm, all fingers, thumbs, seams, and cuff. Seams need extra attention because they are the first place water enters.
Step 3 — Apply extra wax to high-stress zones
The fingertips, thumb crotch, and palm heel take the most abrasion. Apply two passes of wax on these areas. The wax layer will look heavier and chalkier — that is correct.
Step 4 — Melt the wax in with a hair dryer
Set the hair dryer to medium heat. Hold it 3 to 4 inches from the glove surface and move it slowly across the waxed area. Watch the white layer — it will gradually disappear as the wax melts into the fabric. This takes about 30 to 60 seconds per zone. Do not hold the dryer in one spot for more than 5 seconds or the fabric can stiffen or warp.
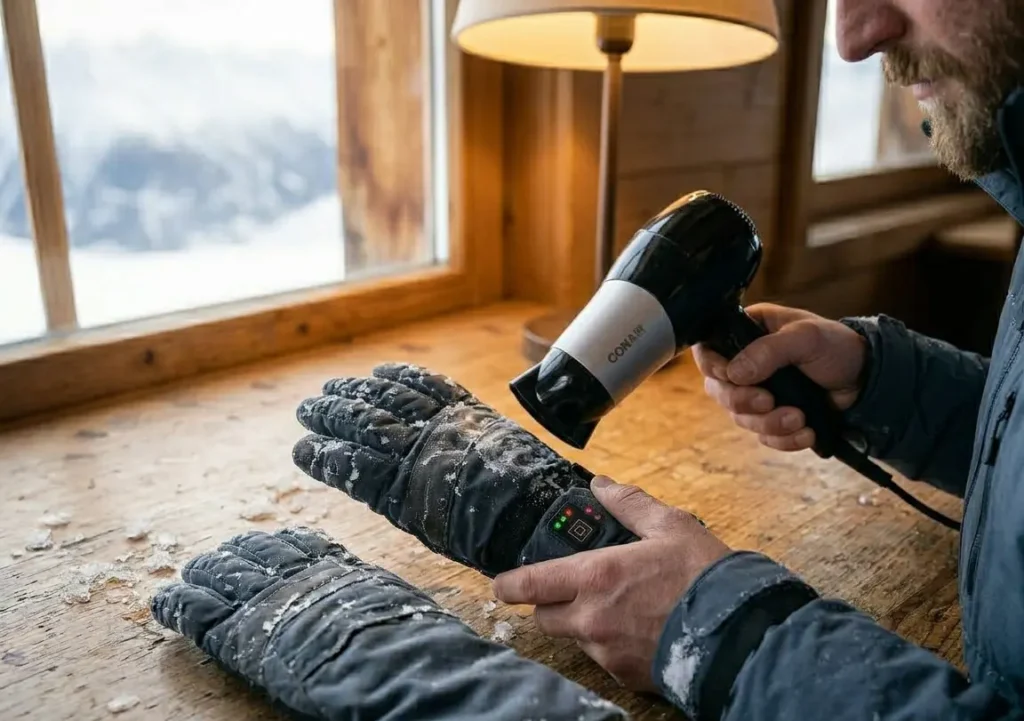
Step 5 — Check for missed spots
After heating, any remaining white patches are wax that has not fully melted in. Return the dryer to those areas until the white disappears. On leather gloves, the surface will darken slightly as the wax absorbs — that is normal and expected.
Step 6 — Let cool and buff
Allow the gloves to cool for 5 minutes. Then buff gently with a dry cloth using circular motions. This removes any surface residue and produces a slight sheen.
Step 7 — Test the result
Drip cold water on the palm and fingertip zones. Properly applied wax causes water to bead immediately and roll off. If water soaks in on any area, that spot needs another pass of wax and another heating cycle.
Step 8 — Flex the gloves
Bend all fingers fully and make a fist ten times. This ensures the wax has not stiffened the glove at the flex points. The gloves should feel close to normal flexibility within a few minutes of movement.
How I Tested It — Real Results
I tested the wax candle method on two pairs of ski gloves: a fabric-shell synthetic pair with worn DWR coating and a leather pair that had been used for three seasons without conditioning or waterproofing.
Before treatment, I ran the bead test on both pairs — poured cold water onto the palm. On the synthetic pair, water soaked in immediately. On the leather pair, it soaked in within three seconds. Neither pair was beading water at all.
After applying paraffin wax and heat-setting it, I repeated the bead test. Both pairs beaded water immediately. The water rolled off the surface without soaking in at any point on either glove.
I then used both pairs across a full ski day in wet spring snow — approximately -2°C with heavy snowfall and three falls in wet snow. At the end of the day, I pressed the exterior of both gloves firmly with a dry cloth. The outer fabric was slightly damp on the synthetic pair at the fingertips where the most snow contact occurred, but the interior lining of both gloves was completely dry.
By contrast, the same synthetic pair before treatment was producing damp interior lining within the first two hours of wet conditions. The wax treatment extended functional water repellency through a full wet day, which was a significant improvement over the untreated state.
One unexpected result: the leather pair also felt noticeably more supple after treatment. The beeswax I used on the leather pair contributed to conditioning the material, not just waterproofing it. The fingertips — which had been slightly stiff before treatment — flexed more easily after.
The wax method is most effective on gloves where the DWR coating has worn but the membrane is still intact. On my synthetic pair, the improvement was clear and lasted four ski days before the bead test showed it needed reapplication. On the leather pair, the treatment lasted six days before the same reapplication threshold.
One thing I noticed during testing is that the first application is never perfect — I missed small areas around the seams on my first attempt, and those spots failed the bead test immediately. A second pass fixed it completely, but it’s worth knowing that results depend heavily on how thorough you are.
When This Works — and When It Doesn’t
Works well on fabric and nylon shell gloves with worn DWR. This is the primary use case. If your gloves used to bead water but no longer do, the DWR has worn and wax restores it. These gloves respond well to the wax method and show immediate improvement on the bead test.
Works well on leather gloves as both waterproofing and conditioning. Wax — particularly beeswax — penetrates leather and both waterproofs and conditions the material simultaneously. Leather that has dried out and started showing early cracking absorbs wax well and becomes more supple after treatment.
Does not fix a failed waterproof membrane. If the interior of your glove gets wet on dry days, or if the outer surface is dry but your hand is still damp, the membrane has failed. If the membrane has failed, no surface treatment will stop water from getting inside. This is the most important limitation to understand.
Does not work well on heavily abraded palms. If the outer shell fabric on the palm is physically worn thin or fraying, the wax has no intact fibre structure to bond with. The treatment will be ineffective in those specific zones regardless of how well it is applied.
Lasts shorter in wet and slushy conditions. The wax coating wears faster in heavy wet snow than in dry cold powder. In spring slush conditions, expect reapplication every three to four ski days. In dry cold conditions, the coating lasts five to seven days.
Which Glove Type Gets the Best Results
| Glove Type | How Wax Candle Performs |
| Nylon / fabric shell | Excellent — wax bonds well to fabric fibres; improvement on bead test is immediate and clear |
| Polyester shell | Good — similar to nylon; heat-setting is essential to ensure bonding rather than surface sitting |
| Full-grain leather | Excellent — wax conditions and waterproofs simultaneously; beeswax preferred for leather |
| Split leather | Good — absorbs wax well but may need more frequent reapplication than full-grain |
| Soft-shell synthetic blend | Variable — test a small area first; some soft-shell materials respond well, others resist bonding |
| Gloves with active membrane | Does not address membrane failure — wax only affects outer shell surface |
| Heavily abraded palm zone | Ineffective in worn zones — no intact fibre structure to hold the wax |
Mistakes That Ruin the Treatment
Using a scented candle
Scented candles contain fragrance oils that prevent wax from bonding to fabric and leave a greasy residue that actually repels the treatment. The smell also intensifies when the gloves get wet and warm. Use only plain, unscented paraffin or beeswax.
Applying wax to damp or dirty gloves
Moisture under the wax layer creates steam when heated, pushing the wax off the surface rather than letting it bond. Dirt and salt create a barrier between wax and fibre. Both produce treatments that flake off within the first run.
Skipping the heat step
Without heat, the wax sits on top of the fabric as a surface layer. It will bead water briefly but wears off within one session. Heat is what causes the wax to penetrate the fibre and bond. This step cannot be skipped.
Overheating with the dryer
Holding the hair dryer in one spot for more than five seconds can stiffen synthetic materials, warp seams, or delaminate the outer shell from the lining on thin gloves. Keep the dryer moving and maintain 3 to 4 inches of distance from the glove surface.
Missing the seams
Seams are the first place water finds a path through any glove. They require two passes of wax and careful heat application because the wax needs to penetrate the thread as well as the surrounding fabric. A treatment that ignores seams will fail at the seams first.
Applying too much wax and not heating it fully
Thick white patches that are not fully melted in produce a stiff, chalky residue on the surface rather than a bonded waterproof layer. The wax should disappear into the fabric after heat application. Any remaining white patch needs more heat.
Signs the Treatment Is Wearing Off
| Warning Sign | What to Do |
| Water soaks in instead of beading on the surface | Reapply wax immediately — DWR protection has worn through |
| Outer shell feels wet and heavy after 30 minutes | Treatment has worn in wet conditions — reapply before next session |
| White chalky residue reappearing on glove surface | Unbonded wax from incomplete heat application — reheat those zones |
| Wax visibly flaking off the surface | Application was on damp or dirty surface — clean, dry, and reapply |
| Treatment wearing off at fingertips faster than elsewhere | Normal — high-friction zones wear first; spot-treat fingertips more frequently |
| Leather stiffening despite wax application | Wax applied without adequate penetration — apply beeswax with longer heat time |
Who This Method Works Best For
Occasional skiers with gloves that no longer bead water. The wax method provides good water repellency for three to five ski days before reapplication is needed. For a skier doing ten days per season, reapplying twice across the season takes thirty minutes total. This is a practical and cost-effective maintenance approach.
Skiers with leather gloves needing both waterproofing and conditioning. Leather gloves benefit more from the wax method than synthetic ones because wax addresses two maintenance needs simultaneously. A leather glove treated with beeswax every five to six ski days maintains waterproofing, stays supple, and resists the cracking that accelerates with dry leather in cold air.
Travelers who need a portable solution. A candle and hair dryer are available in any hotel room in any ski town. For a multi-day trip where conditions are wetter than expected, the wax method can restore water repellency the night before without needing to find a specialist product.
Daily or heavy skiers who ski in consistently wet conditions. The wax method needs reapplication every three to four days in wet snow. For a skier doing twenty or more days per season in wet conditions, this becomes a regular maintenance commitment. It remains effective but requires consistent attention — reapplication cannot be skipped when conditions are regularly wet.
Should You Use This Method? Run This Check First
| Question | What Your Answer Means |
| Does water soak in rather than bead on the outer shell? | Yes — the DWR has worn; wax will restore it |
| Is the interior of the glove dry despite the exterior being wet? | Yes — membrane is intact; wax will solve the problem |
| Is the interior damp even when conditions are dry? | Membrane may have failed — wax will not fix this |
| Are the gloves clean and fully dry right now? | Must be yes before applying; do not skip this step |
| Do you have an unscented plain candle available? | Required — scented candles do not work correctly |
| Are the gloves leather or fabric/nylon shell? | Both work well; leather benefits from beeswax specifically |
| Is the palm fabric worn thin or fraying? | Wax will not work on heavily abraded zones — those need repair or replacement |
| Do you ski in wet or slushy conditions regularly? | Expect reapplication every 3–4 days in wet snow |
Troubleshooting: Why Your Treatment Might Not Be Working
Water is still soaking in after treatment. Most likely cause: the gloves were not fully dry before application, or the heat step was rushed and the wax did not bond. Clean and dry the gloves completely, reapply wax with firm pressure, and heat each zone until the white coating fully disappears. Then test again.
The wax is flaking off after the first run. Wax applied without heat does not bond. This is the most common failure. The white layer should be invisible after proper heat application — if it is visible or flaking, the heat step was skipped or insufficient. Reapply and heat until the wax disappears entirely into the fabric.
The treatment works at first but wears off within one ski day. Either the gloves were damp when treated, or the conditions are particularly wet and the coating is wearing faster than normal. Spring slush is particularly aggressive on wax coatings. Reapply more frequently in wet conditions and ensure gloves are bone-dry before each application.
The leather gloves feel stiffer after treatment. Too much wax was applied without sufficient heat to penetrate the leather. Apply a thinner coat, heat longer and more slowly, and flex the gloves immediately after treatment. The heat needs to drive the wax deep into the leather, not leave it as a surface layer.
The treatment worked on the back of the hand but not on the seams. Seams were not given enough wax or heat. Apply two passes of wax specifically along each seam, then heat those areas carefully. The thread itself needs to be waxed, not just the fabric on either side of the seam.
When to Skip This Method
Skip the wax candle method if the waterproof membrane inside the glove has failed. The way to confirm this is to check whether the interior of the glove gets damp even when the outside looks dry and unsoaked. If the answer is yes, the problem is internal and surface wax cannot address it.
Skip it if the outer fabric on the palm or fingertips is abraded or worn thin. Wax bonds to intact fabric fibres. Where the fabric structure has broken down from repeated abrasion against ski poles, rails, or boot buckles, there is nothing for the wax to bond with and the treatment will not hold.
Skip it if the gloves are due for replacement anyway. Wax prolongs the water repellency of gloves that are structurally sound but surface-degraded. A glove that has failing insulation, separated seams, or a compromised membrane is not worth treating — the investment of time is better placed in a new pair.
How Often to Reapply — and How to Make It Last
Dry cold powder conditions:
Reapply every five to seven ski days. The bead test is the reliable indicator — pour cold water on the palm. If it soaks in rather than beading, the coating needs refreshing.
Wet snow and spring slush:
Reapply every three to four ski days. Wet snow wears the coating faster because the gloves spend more time in contact with liquid water.
After any washing:
Washing removes wax. Reapply after every wash regardless of how many ski days have passed since the last treatment.
To extend the treatment life:
Let gloves dry completely between sessions. Wax applied to damp gloves from the previous day’s use does not bond as well as wax applied to fully dried gloves. Store treated gloves in a dry location — not in a sealed bag, which traps moisture against the treated surface.
Spot reapplication:
Fingertips and palm heels wear first. Rather than reapplying to the whole glove every session, focus spot treatments on those specific zones when the bead test shows them failing while the rest of the glove is still performing.
If the wax method restores water repellency on the outer shell but you find moisture still reaching your hands, the next step is understanding what your waterproof gloves’ membrane is doing and why it may be failing under heavy snow contact. That breakdown — what different waterproofing constructions actually protect against and what they do not — is covered in Waterproof Ski Gloves: What Actually Keeps Your Hands Dry.
The wax method is not a permanent solution — it is a maintenance fix. When applied correctly, it restores water repellency quickly and cheaply, but it depends entirely on the condition of the glove underneath. If the structure is still sound, this method works. If it isn’t, no surface treatment will compensate for that.
About the Author
Awais Rafaqat has spent over 15 years testing ski gear across North America — from the dry sub-zero conditions of the Rockies to the wet, heavy snow of the Pacific Northwest. His focus is real-world performance: what gear actually does in the conditions skiers encounter, not what the spec sheet says it should do.
© SkiGlovesUSA.com — Method tested across multiple glove types and conditions. No sponsored product mentions.