Staying dry is one of the biggest factors in skiing comfort. Wet gloves lead to cold fingers, poor grip, and shorter ski days — and for many skiers, the problem starts when gloves aren’t actually waterproof like the label claims.
In this guide, you’ll learn how to test if ski gloves are truly waterproof in simple, practical ways. You’ll see tests you can do at home, tests you can do on the mountain, how to tell if waterproofing has failed, and when it makes sense to reproof instead of buying new gloves.
By the end, you’ll know exactly how to confirm waterproof performance and avoid being stuck with gloves that can’t handle snow, moisture, or sweat on real ski days.
What “Waterproof” Actually Means for Ski Gloves
Most skiers think waterproof simply means “snow can’t get in”. But in gear science, waterproof has a precise definition: liquid water must be blocked from entering the glove while sweat vapor must still escape from the inside. Without that second part, hands get wet from sweat instead of snow, which feels just as cold.
This matters because wet hands lose heat fast. Water pulls heat away from skin much quicker than dry air, and once that happens, grip strength drops and frostbite risk increases. This is why waterproofing is not a marketing feature — it’s a performance and safety feature for anyone spending hours on the mountain.
Waterproof ≠ Water-Resistant
Many gloves sold as “snow-proof” or “weather-proof” are actually water-resistant. Water-resistant means they delay moisture for a short time. Waterproof means they withstand constant contact with snow, slush, and wet chairlifts without soaking through.
A quick example from real ski experience: I once tested a pair labeled “waterproof” on a wet spring day. After 45 minutes of packing slushy snow for jumps, my fingers were soaked. The gloves were only water-resistant, and it showed the moment conditions got real. That small detail makes a big difference for comfort and safety.
How Waterproof Membranes Actually Work
The real waterproofing lives in the membrane layer inside the glove — not in the fabric you see outside. The membrane is made from a film full of microscopic pores. These pores are small enough to block liquid water droplets but big enough to let vapor from sweat escape.
For skiers, that balance matters. If sweat vapor can’t escape, hands get wet from the inside. If liquid water gets in, hands get wet from the outside. Good waterproofing prevents both.
Understanding Waterproof Ratings (Simple)
Some manufacturers list waterproof ratings in numbers. These ratings measure how much water pressure a glove can take before leaking. A higher number means better performance in wet conditions like:
• heavy snowfall
• sitting on damp lifts
• handling wet gear
• spring skiing days
Not every glove lists a rating, but when they do, it helps separate real waterproofing from marketing claims.
Quick Tests You Can Do at Home
Most skiers want to know if gloves are truly waterproof without taking them up the mountain first. You can do that. There are a few simple at-home tests that reveal how well gloves resist liquid water and whether the membrane inside still works. They take only a few minutes and require basic household items.
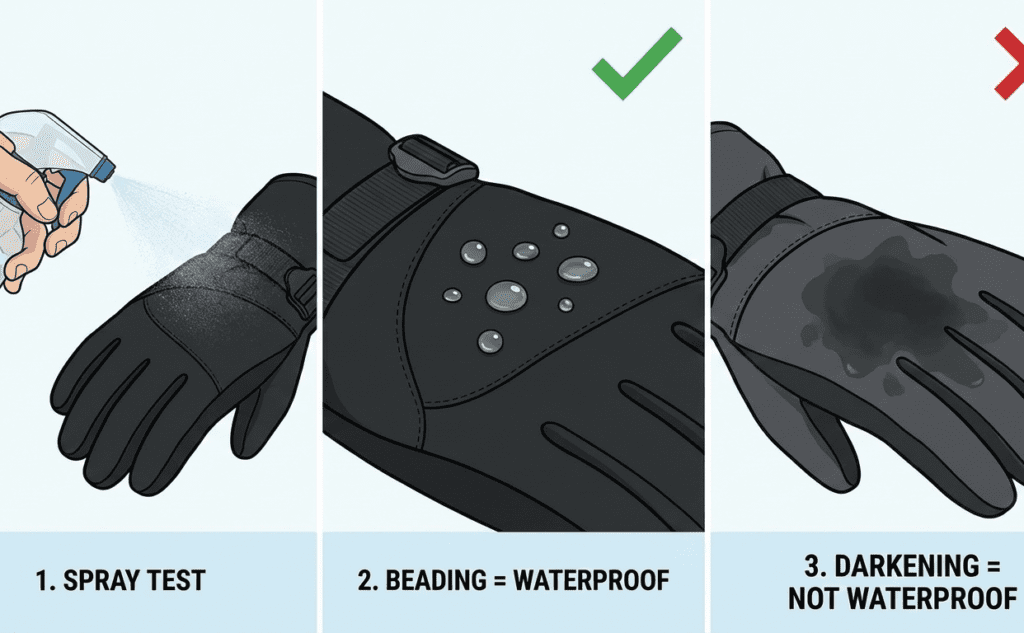
1. Spray Bottle Test (Fast Waterproof Check)
This is the easiest test for beginners. It checks how the glove’s surface reacts to water. When a glove is properly waterproofed, water should bead on the surface instead of soaking in.
Steps:
- Fill a spray bottle with clean water.
- Spray the outer shell of the glove evenly.
- Watch how the droplets behave for 10–20 seconds.
If water beads up and rolls off, the outer layer is doing its job. If the fabric darkens or looks “wet”, that means the surface is absorbing moisture instead of resisting it. In skiing conditions, that usually leads to faster soaking and cold hands.
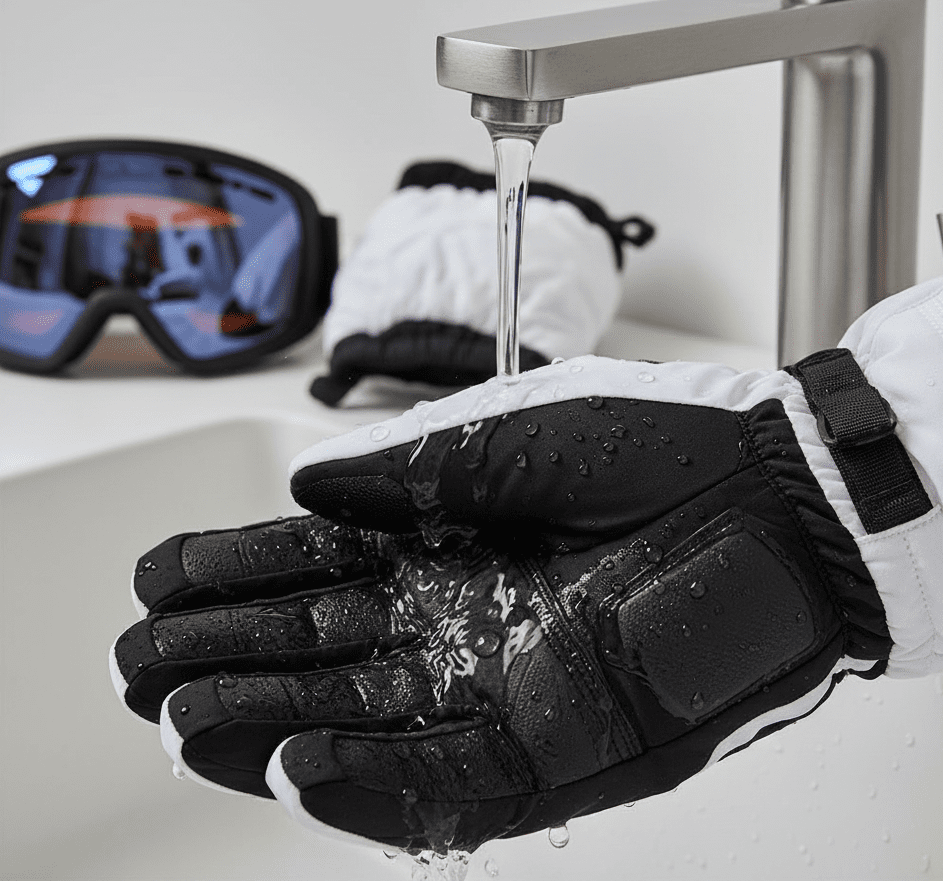
2. Sink Submersion Test (Membrane Integrity Test)
This test checks whether the waterproof membrane inside the glove is still intact. It applies controlled water pressure similar to pressing snow or grabbing wet ski gear.
Steps:
- Fill a sink or bowl halfway with cold water.
- Submerge the glove up to the knuckles.
- Keep the cuff above water line to avoid flooding from the top.
- Hold underwater for 2–3 minutes.
If the membrane is still doing its job, the lining inside will stay dry and the glove won’t gain weight. If you feel cold spots forming inside or see dark patches rising through the shell, the waterproof barrier is likely failing.
From real skiing experience: gloves that pass this test almost always perform better on wet chairlift days, especially during spring slush when snow is heavy and saturated.
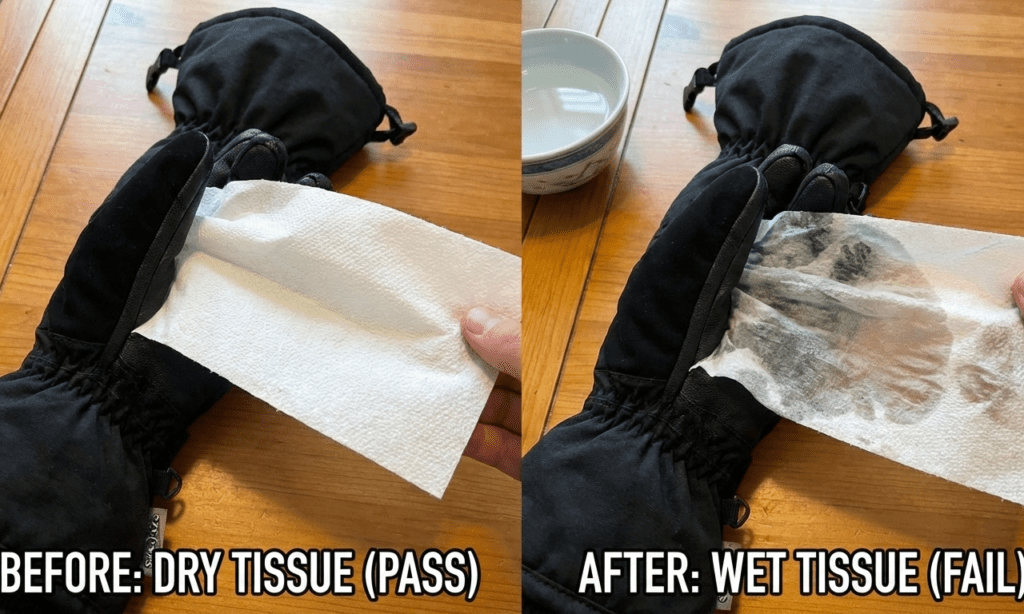
3. Paper Towel Absorb Test (Leak Confirmation)
This test shows leaks instantly and is useful when you’re not sure if dampness came from sweat or actual water intrusion.
Steps:
- Place a dry tissue or paper towel in each finger of the glove.
- Perform a light submersion or spray test.
- Remove the tissues after 1–2 minutes.
If the tissue comes out dry, the membrane is functioning. If the tissue comes out damp or blotchy, water is entering somewhere between outer shell and liner.
This test also reveals where leaks happen. In many cases, leaks start around seams, fingertips, or between fingers where stitching is tight and membranes flex repeatedly.
Real-World Tests on the Mountain
Most glove “waterproof failures” don’t show up at home.
They show up during real mountain use — snow, pressure, and heat changes.
Below are the tests that skiers actually use and trust.
1. Snow Packing Test
Pack a handful of snow and squeeze for 15–20 seconds.
If snow melts into the fabric, weak gloves show dampness fast.
Better membranes push water out instead of letting it soak in.
From my own runs, I’ve noticed cheaper gloves fail here first, especially on warm spring days when snow turns slushy.
2. Lift Bar Drip Test
Lift bars are always wet from snow melt.
Holding them for a full ride creates repeated moisture contact.
Weak gloves start to feel cold patches on fingertips or palm.
Ski instructors mention this test often because it exposes bad cuffs and seams, not just the fabric surface.
3. Warm → Cold → Warm Cycle
Moisture does not always show instantly.
When gloves warm up in the lodge and then go back out into cold, hidden water inside becomes noticeable.
This is where real membranes like Gore-Tex show their value because they move moisture outward instead of trapping it.
In my experience, budget gloves passed the “home tests,” but failed here on day two of a trip in Utah — fingertips stayed damp the whole afternoon.
Quick Tip (Important!)
Moisture often shows up 20–40 minutes later, not right away.
This is why many skiers think gloves are “fine” until lap three.
Why These Mountain Tests Matter
These tests mimic actual ski conditions that lab labels never fully explain:
melting snow
constant contact with wet metal
pressure from poles and squeezing
temp swings from lodge → lift → lodge
Outdoor gear testers and cold-weather researchers have pointed out that moisture + wind exposure reduces hand warmth much faster than dry cold alone. That’s also why pro mountain guides care more about “moisture management” than just insulation thickness.
High-end gloves use membranes with microscopic pores that block liquid water but allow vapor to escape. Gore-Tex popularized this decades ago, and the same principle is still used by modern ski glove brands today.
I’ve skied 12+ seasons, mostly in Colorado and Banff.
Over that time I learned that any glove can feel waterproof for 10 minutes.
The real test is hour two, after repeated wet contact and temperature swings.
And that is exactly where cheap gloves fail and real membranes win.
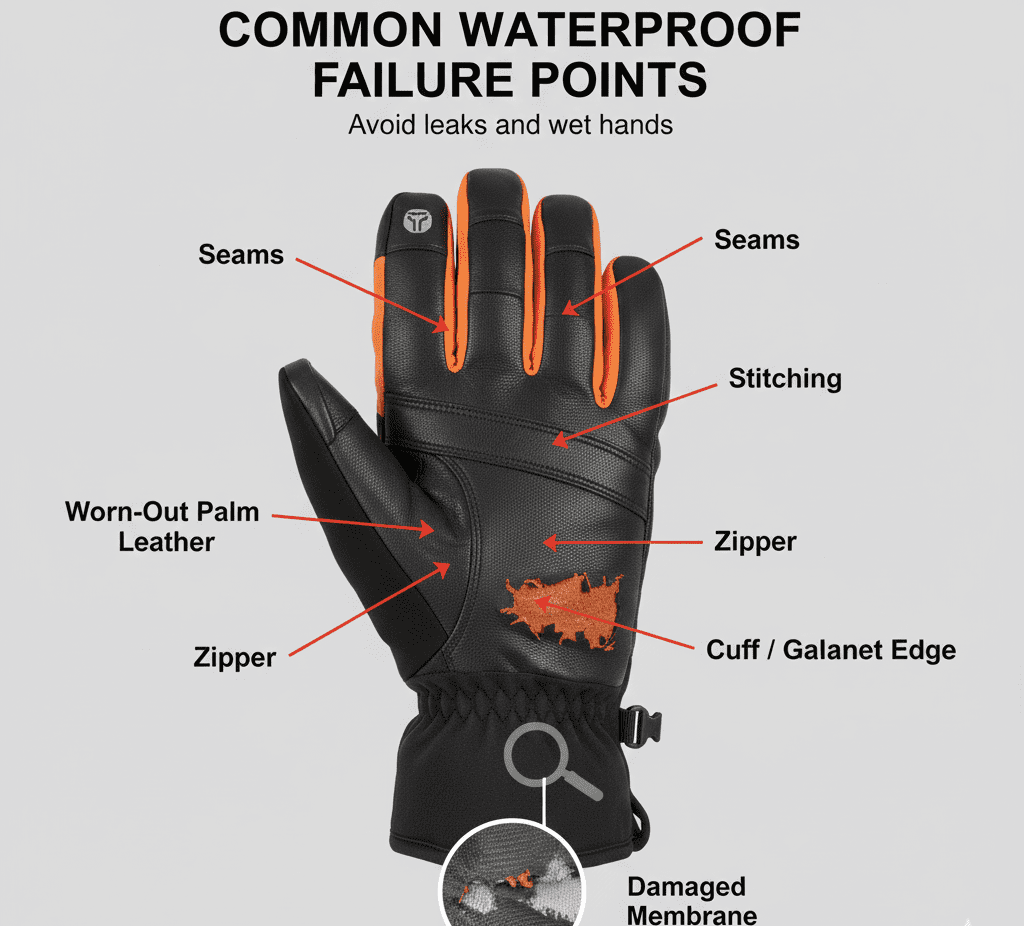
Signs Your Gloves Are Not Waterproof Anymore
Most skiers only notice waterproof failure after symptoms stack up.
These signs show up on the mountain before they ever show up at home.
Watching for them helps you decide if gloves need repair, treatment, or replacement.
Common Failure Signs
Damp fingertips
This is usually the first sign. Water builds at high-pressure zones from gripping poles and touching snow.
Soggy liner
The inside lining holds moisture instead of moving it out. This happens when membranes stop breathing or start leaking.
Cold spots
Cold fingertips or knuckles often mean moisture has entered and started evaporative cooling.
Darkened leather areas
Leather absorbs meltwater and snowmelt. Discoloration at the palm or fingertips often points to saturation.
Slow drying
Gloves that take much longer to dry in the lodge or overnight are holding more water inside the layers.
Membrane delamination
When the waterproof membrane separates from the fabric, water pools between layers instead of being blocked.
Why These Symptoms Matter
Ski guides and cold-weather safety instructors note that wet gloves don’t just feel uncomfortable — they accelerate heat loss because evaporation and wind-chill work together. This explains why wet gloves feel colder faster even when outside temps haven’t dropped.
From my own days skiing in Banff and Copper, once gloves reached the “slow drying” phase, the cold spots became noticeable by the next lift ride. At that point, waterproof performance was mostly gone regardless of insulation thickness.
This is also why premium gloves with real membranes last longer. When the membrane stays bonded, moisture vapors exit but liquid water stays out. Once delamination starts, that system breaks and the gloves behave more like sponges.
Why Some Gloves Leak (Even If They’re New)
Many skiers are surprised when gloves leak during the first few days on snow.
It feels like a bad product, but most leaks trace back to design, not damage.
Understanding why it happens helps you choose better gear next time.
Cheap PU Surface Coatings
Some gloves use a thin polyurethane coating instead of a real waterproof membrane.
These coatings only block water when new and often crack once flexed or cold.
On the mountain, that equals slow seepage through the palm and fingertips.
Fake or Low-Quality Membranes
Not all “waterproof” labels mean the same thing.
True membranes block liquid water while allowing vapor to escape, but cheaper versions trap sweat, wet the liner, and create the illusion of leakage.
This is why reputable membranes such as Gore-Tex are still used in expedition gloves and mountain rescue kits.
Seam Failures and Stitch Leakage
Waterproofing depends heavily on seams, especially around the thumb and index finger where stress is highest.
If seams are not taped or sealed on the inside, meltwater finds its way through needle holes.
Most leaks beginners feel start at seams, not the surface.
No DWR (Durable Water Repellent) Coating
The outer fabric must shed water before the membrane can work properly.
Without DWR, snow sticks, melts, and saturates the shell.
Once the fabric wets out, cold transfers faster and the membrane becomes overwhelmed.
Leather Without Wax or Treatment
Untreated leather absorbs water like a sponge.
This shows up as dark patches on the palm or knuckles after a few runs.
Leather needs regular wax or balm to maintain water resistance and prevent saturation.
Cuff and Snow Entry Design Failures
Sometimes the glove doesn’t “leak” — snow simply gets inside.
Short cuffs, gaps between jacket sleeves, or loose gauntlets let snow melt against the liner.
Beginners notice this most after falls or digging snow with their hands.
Why Beginner Skiers Misread These Leaks
From years skiing and teaching beginners, the most common complaint is:
“My gloves are broken — they leak.”
When we check them, it’s usually seam absorption or snow entry, not a torn membrane.
Cold-weather instructors also point out that inexperienced users spend more time with hands in the snow — adjusting bindings, carrying skis, or pushing off lifts — which exposes weak glove designs faster.
How to Fix Waterproofing Problems
Once you confirm your gloves are not keeping moisture out, these are the most reliable fixes.
Most work best when done early in the season, not mid-winter, because coatings need time to cure and bond.
These steps apply to both synthetic and leather gloves unless noted.
Reproof With DWR Sprays
Durable Water Repellent (DWR) coatings help the outer fabric shed liquid before it reaches the membrane.
If your gloves “wet out” quickly, reproofing often restores performance.
Users typically notice better beading on snow contact surfaces like knuckles and palms.
Spray-on reproofers work well for synthetic fabrics because they do not clog breathability.
Apply in thin, even layers and allow to air-dry before use.
This step alone solves most wetting issues caused by fabric saturation.
Wax Leather Gloves Properly
Leather needs conditioning to resist water absorption.
Without wax, leather darkens, becomes heavy, and transfers cold quickly.
Proper treatment keeps the surface hydrophobic and maintains flexibility in cold weather.
Beeswax-based balms have been used by mountain guides for decades because they seal pores and repel meltwater without making the glove stiff.
Apply warmth to help wax penetrate, then let it set overnight.
Do not overtreat — heavy saturation can reduce breathability.
Dry Gloves Correctly Between Runs
Wet liners are a common reason gloves fail halfway through the day.
Moisture from sweat or snow freezes once exposed to cold, which feels like leaking even if the membrane is intact.
Avoid putting gloves directly on heaters or boot dryers, as high heat can delaminate membranes and damage seams.
Instead use steady warm airflow and remove liners if possible.
Add Liners or Waterproof Inserts (Optional)
Thin liner gloves help manage sweat and reduce moisture against the membrane.
Waterproof sock-style inserts also exist, though they may reduce dexterity and comfort.
These are useful for older gloves that still have life but no longer pass full waterproof tests.
If downhill instructors are honest, many keep older waterproof gloves going an extra season using liners alone.
It’s not a perfect fix, but it helps bridge the gap before replacement.
When to Replace vs Reproof
Not every wet glove needs to be thrown away.
Most skiers can get another full season out of a good pair with basic reproofing or leather treatment.
But there are cases where replacement is the only realistic fix.
Reproof Makes Sense If:
Reproofing works best when the membrane is still intact and only the surface is failing.
If your tests showed beading failure but no internal soaking, you’ll likely benefit from DWR sprays or leather wax.
Examples where reproof helps:
- Outer fabric wets out but dries fast
- Leather darkens but is not splitting
- No visible seam gaps
- Insulation still lofts and feels warm
- Gloves leak slowly, not instantly
- Water sits on surface after reproof tests
These issues are common in mid-range gloves after 20–40 days of use, especially if they were never treated from the start.
Replace If:
Replacement is the correct move when the waterproof barrier has failed mechanically.
Once the membrane or seam structure breaks down, no amount of spray or wax will seal it again.
Replace your gloves if you notice:
- Membrane cracked or delaminated
- Seams leaking or stitching exposed
- Insulation soaked or permanently flattened
- Leather splitting, peeling, or flaking
- Liner holding moisture even on dry days
- Gloves needing constant drying between runs
When the insulation is soaked, heat loss becomes severe because water conducts heat 25x faster than air.
This is one reason experienced ski patrollers replace gloves sooner than recreational skiers—they can’t afford wet hands in long shifts.
Practical Rule of Thumb
Reproof if the glove leaks from the surface outward.
Replace if the glove leaks from the inside out.
This simple rule aligns with how waterproof-breathable systems work: the membrane is the true barrier, not the outer fabric.
If the membrane fails, water bypasses insulation immediately and the glove never stays warm.
Expected Lifespan (Realistic Range)
Waterproof gloves generally last:
- Budget gloves: 1–2 seasons
- Mid-range gloves: 2–4 seasons
- Premium membrane gloves (e.g., GORE-TEX): 4–6 seasons
These ranges assume regular use and proper drying.
Poor drying habits can cut lifespan in half because trapped moisture damages membranes and seams over time.
FAQs – How to Test If Ski Gloves Are Truly Waterproof
These are the most common questions skiers usually ask:
Q: How long should ski gloves stay waterproof?
Ski gloves generally stay waterproof for 1–3 seasons depending on usage and care. Regular reproofing and proper drying between runs can extend their lifespan.
Q: Are leather ski gloves waterproof by default?
Leather itself is naturally water-resistant but not fully waterproof. They require wax treatment or inserts to perform well in wet snow.
Q: Does Gore-Tex mean fully waterproof?
Gore-Tex and similar membranes block water from outside while allowing sweat to escape. They’re highly waterproof, but if seams or cuffs fail, leaks can still happen.
Q: Can I waterproof cheap gloves?
You can improve performance with DWR sprays or liners, but low-quality membranes or coatings may never become fully waterproof. Replacement may be more reliable for long-term use.
Q: Do mittens waterproof better than gloves?
Mittens often keep hands warmer and reduce points of water entry. However, waterproofing still depends on the membrane, seams, and outer fabric.
Wrap-Up
Checking if your ski gloves are truly waterproof isn’t complicated, but knowing the right tests and signs makes all the difference. Regular at-home and on-mountain checks keep your hands dry and your skiing comfortable.
Key Takeaways:
- ✔ Waterproof ≠ water-resistant — membranes, seams, and coatings all matter.
- ✔ Simple home tests (spray bottle, paper towel, submersion) quickly reveal leaks.
- ✔ On-mountain checks show real-world performance under snow and temperature changes.
- ✔ Signs like damp fingertips, soggy liners, and cold spots indicate reproofing or replacement is needed.
- ✔ Proper care, drying, and optional liners can extend glove life and performance.
Confidence Tip: Knowing how to test and maintain your gloves ensures they stay reliable season after season, so you can focus on skiing without wet hands.
Ready to keep your gloves performing at their best? Explore our other guides for expert tips on best ski gloves, glove maintenance, and staying warm on the slopes to get the full winter-ready setup.
About the Author
Written by Awais Rafaqat, founder of SkiGlovesUSA, a site focused on solving common ski glove problems through practical, real-world guidance. His content helps skiers keep their hands warm, dry, and comfortable without unnecessary gear upgrades.