Ski glove cracking almost never happens uniformly across the whole glove. It starts at specific locations — the thumb joint, the knuckle line, the finger bases — and spreads from there. The reason those locations crack first is not random. They are the highest-flex points on the glove, and the material at those points undergoes more stress cycles per ski day than anywhere else. Why do ski gloves crack means understanding what is happening to the material at those precise locations, not just that cracking happens.
Ski gloves crack primarily because the outer material loses flexibility. In leather gloves, this usually happens when the natural oils that keep the leather flexible dry out over time. In synthetic gloves, cracking typically occurs when the polyurethane coating stiffens in cold temperatures and begins forming micro-fractures during repeated flexing.
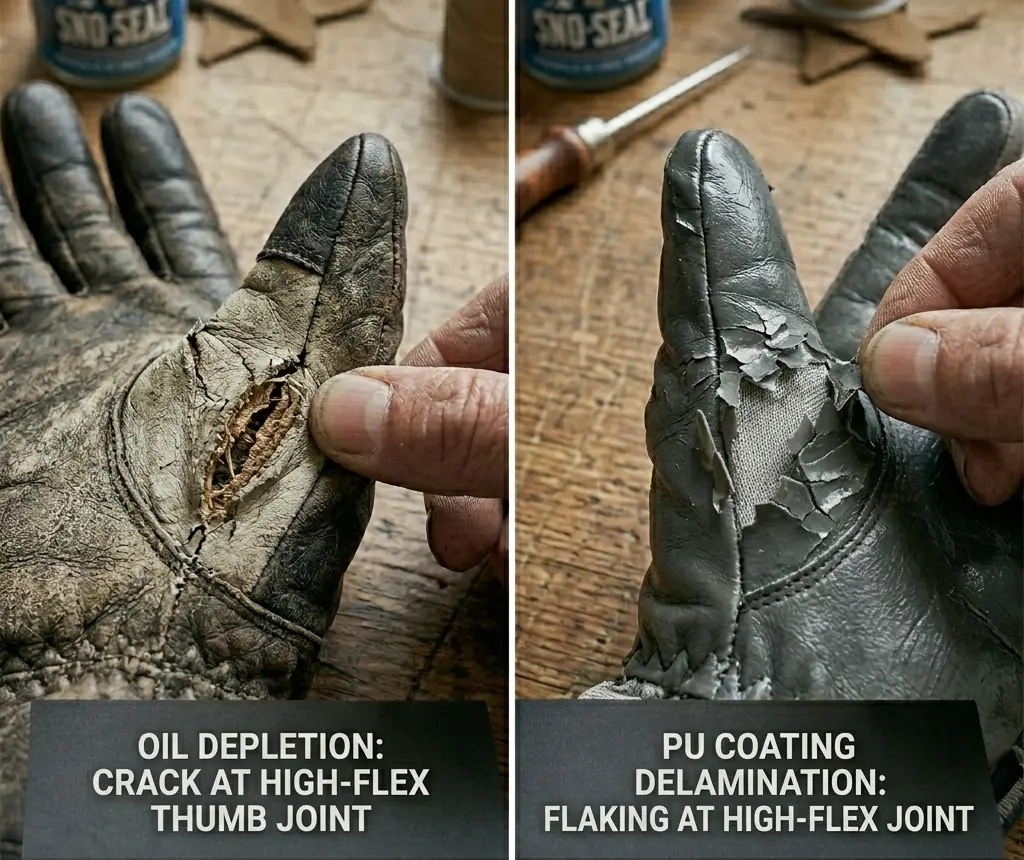
The mechanism is different for leather gloves and synthetic-coated gloves, which is why the same crack pattern can mean very different things depending on what your gloves are made from. A crack at the knuckle of a leather glove is usually a sign of oil depletion that can still be addressed if caught early. An identical crack location on a polyurethane-coated glove is often the start of coating delamination — a structural failure that conditioning will not reverse. Treating both the same way produces the wrong result in one of the two cases.
This guide works through the cracking mechanisms for each material type, how to read where and how your gloves are cracking to identify the cause, and how to determine whether the stage of cracking you are looking at is recoverable or structural. The focus here is specifically cracking: why it happens, how it progresses, and what the crack pattern tells you about the glove’s actual condition.
Why Do Ski Gloves Crack: The Real Mechanisms
Understanding why ski gloves crack requires looking at the specific materials used in their construction and how those materials respond to cold, moisture, and repeated flexing.
There are six distinct mechanisms that cause ski gloves to crack. They are not interchangeable — each one produces a specific crack pattern at specific locations, and the fix or replacement decision depends on correctly identifying which mechanism is at work.
Oil depletion in leather
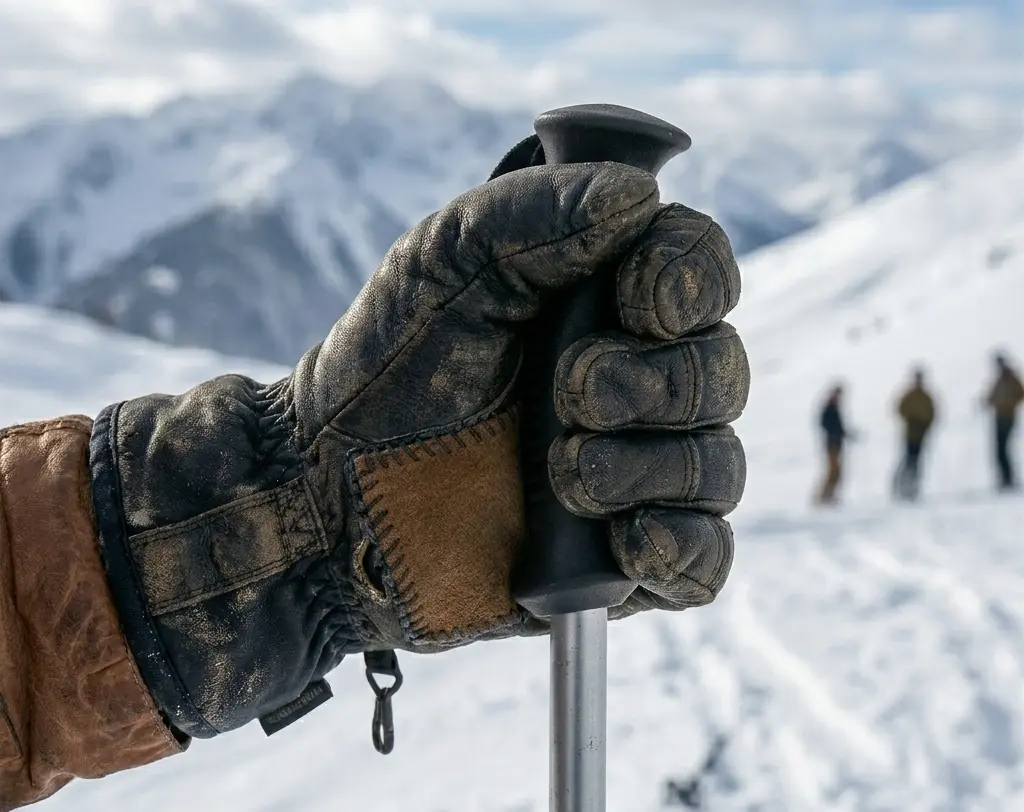
Leather is a biological material that retains flexibility through oils distributed throughout its fiber structure, which is largely composed of collagen fibers. Those oils are not permanently fixed in place. Every ski session removes a small amount through two processes: evaporation from the leather surface in cold, dry air, and mechanical extraction through the repeated compression and extension of flexion. The thumb joint loses oil fastest because it moves through the largest range of motion most frequently. When oil concentration drops below the threshold, the fibres need to flex without damage, and the fibres begin micro-cracking on each movement. Visible cracking at the surface follows. This process is gradual and cumulative. An oil-depleted leather glove that is conditioned before visible cracking begins does not crack. One conditioned after visible cracking has appeared slows further damage but cannot close existing cracks.
Polyurethane coating breakdown
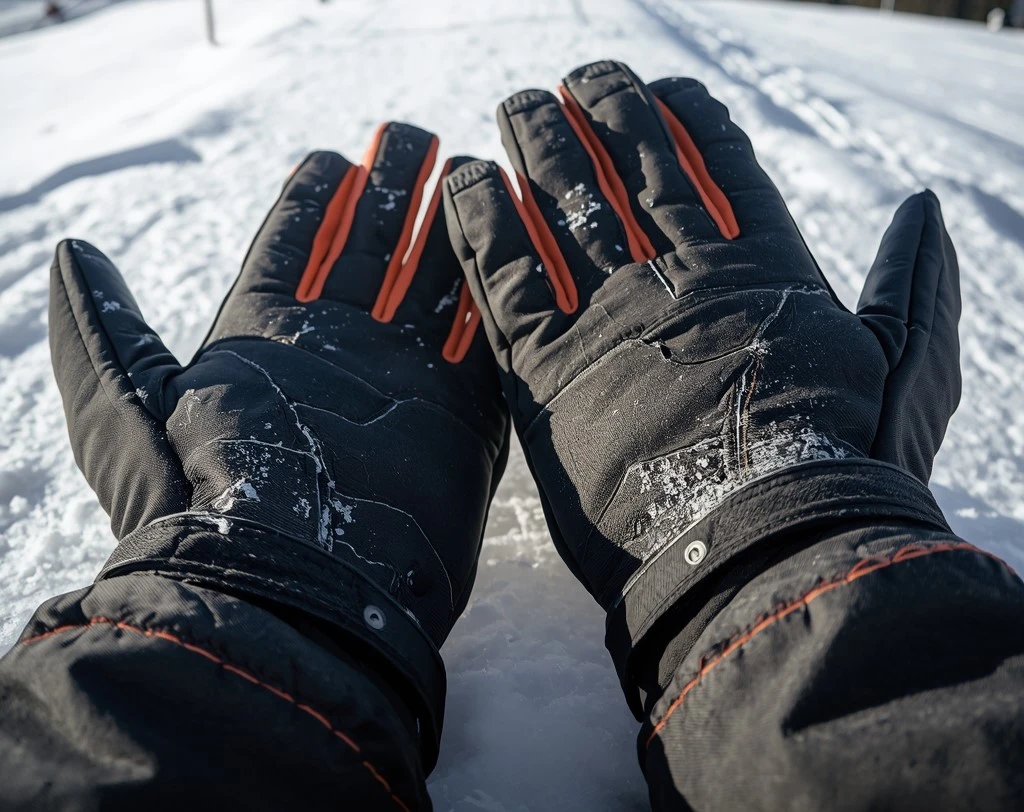
PU-coated gloves — which covers most mid-range synthetic ski gloves — have a base fabric (typically nylon or polyester) with a layer of polyurethane applied to the outside surface. This coating is flexible at moderate temperatures but stiffens significantly below about -10°C. At that stiffness level, the normal hand movements during skiing — gripping poles, releasing, adjusting — flex the coating beyond its elastic limit and create micro-fractures across the surface. These micro-fractures are initially too small to see with the naked eye. In bright light they appear as a fine network of lines across the palm and fingertips — often called crazing. As the cycling continues, those micro-fractures join and widen into visible cracks, and the coating begins separating from the base fabric below.
Cold-cycle embrittlement
Both leather and synthetic materials undergo repeated thermal cycling during ski use: cold on the mountain, then warming in the lodge, then cold again. Each cold phase contracts the material; each warm phase expands it. This cycling applies internal stress to the outer surface layer. In leather, it accelerates oil migration toward the surface where it evaporates. In PU coatings, it propagates the micro-fractures that start at the surface and work inward. The damage from cold cycling is independent of flexion — a glove stored in a car overnight in sub-zero temperatures and then brought into a warm lodge accumulates thermal cycling stress even without being worn.
Flexion stress concentration at anatomical joints
The human hand flexes at four specific points that map directly onto the glove: the knuckle line, the thumb basal joint (thumb crotch), the finger proximal joints (mid-finger), and the wrist. These are not evenly distributed on the glove — the knuckle line and thumb joint take significantly more cumulative stress than the other locations because they move through larger angles more frequently during pole planting and release. Cracking that appears first at these specific locations is a reliable indicator that the material at those points has simply been flexed more than it can handle at its current oil or coating condition. The crack location itself is diagnostic.
PU coating delamination from base fabric
This is a different and more serious failure than surface PU cracking. Delamination occurs when the adhesive bond between the PU coating and the fabric substrate fails. This can be caused by repeated thermal cycling, aggressive washing, or simply age-related adhesive degradation. The visual indicator is different from surface cracking: instead of cracks running across the surface, the coating lifts away from the fabric and peels in flakes or sheets. The base fabric is often still visible and intact underneath. Delamination, once begun, cannot be stopped — each flexion cycle peels more coating away. Surface conditioning does not re-bond delaminated material to the substrate.
Thin construction in high-stress zones
Some budget gloves use PU coatings below the thickness needed to survive a full ski season. The coating is adequate for display in a shop and for the first few outings, but insufficient to withstand the repeated flexion stress of actual skiing, particularly in cold conditions. These gloves begin showing crazing within the first five to ten days on the mountain regardless of how carefully they are maintained. The failure is not caused by user error — it is a materials decision made at manufacturing. The pinch test at purchase — pressing the palm material between fingers and feeling for texture, warmth, and resistance — gives some indication of PU thickness, but thin construction is genuinely difficult to identify before the gloves are used.
Crack Cause Reference
| Crack Cause | Mechanism | Where It Appears | Key Detail |
| Oil depletion in leather | Leather loses plasticising oils through flexion, moisture cycles, and heat exposure | Cracks appear at flex points — knuckles, thumb joint, finger bases | Leather-specific — does not affect synthetic shells |
| Polyurethane coating breakdown | PU coating stiffens in cold, micro-fractures under repeated flexion, then separates | Surface flaking or crazing across palms and fingertips | Worsens faster at temperatures below -10°C |
| Repeated cold-cycle embrittlement | Material contracts sharply in cold; expansion on warming cycles stresses surface | Fine surface cracking visible in bright light before any peeling | Affects both leather and synthetic; worse if dried near heat |
| Flexion stress at joints | Specific anatomical flex points concentrate stress on every hand movement | Cracks at thumb crotch, finger bases, knuckle line — not random locations | First indicator that surface material is losing elasticity |
| PU delamination from base fabric | PU coating separates from woven substrate; typically starts at edges and seams | Peeling flakes rather than cracks; material lifts away from surface | Indicates structural coating failure — cannot be reversed |
| Construction shortcuts (thin PU) | Manufacturers apply minimal PU thickness to reduce weight and cost | Cracking within one season regardless of care | Identifiable at purchase by pinch test and surface texture |
While these mechanisms appear technical, most cracks skiers see fall into only two practical categories: leather oil depletion or polyurethane coating breakdown. The location and appearance of the crack usually make it clear which one you are dealing with.
How I Diagnosed My Own Gloves — What the Crack Location Told Me
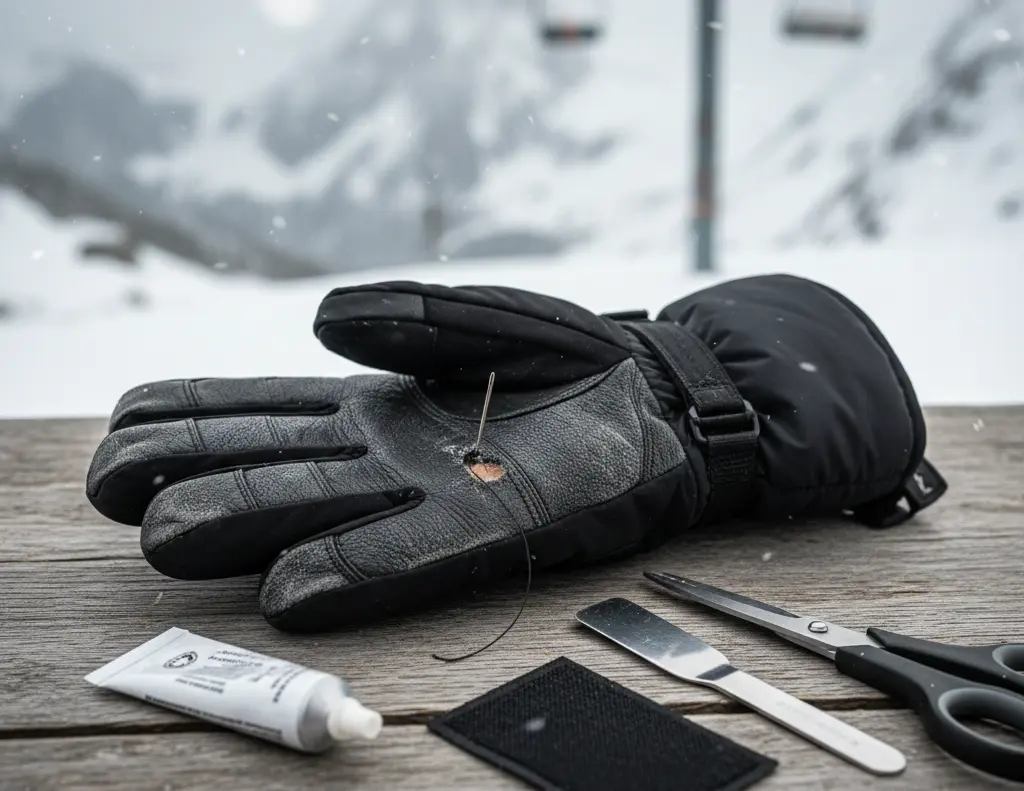
The crack that taught me the most about cracking mechanics appeared on the right glove of a leather pair after approximately forty days of skiing across two seasons. It started at the thumb basal joint — the flex point where the thumb meets the palm — as a barely visible surface line. I noticed it because I was doing a routine conditioning check and ran my fingertip along the palm. The line was raised slightly above the surface, which is characteristic of an early oil-depletion crack in leather: the fibres at that point had pulled apart slightly but hadn’t broken through the full thickness.
My first diagnostic step was the flex test. I held the glove between both hands and bent it at the thumb joint — the same motion as opening the hand widely — and watched whether the crack opened further. A surface-only crack in leather typically does not open significantly under moderate bending. This one opened slightly, which told me it was deeper than just the surface finish. Not through the full thickness, but past the finish layer into the grain.
I applied conditioner directly to that zone and worked it in with my fingertip in circular motions for about three minutes — longer than the rest of the glove — and let it absorb overnight. The following day I ran the flex test again. The crack was visibly shallower and did not open under the same bending stress. Three more conditioning treatments across the following week, with the crack zone receiving extra attention each time, and the crack had closed to the point where it was only visible in direct light at close range.
That crack never fully disappeared, but it also never progressed. The glove skied four more full seasons after that point. The lesson was specific: an early oil-depletion crack caught before it goes through the full leather thickness is recoverable with aggressive conditioning focused on that exact location. A crack I ignored on a different pair — on a PU-coated glove — produced a completely different outcome. It was a similar-looking surface line at the knuckle, but within three sessions it had progressed to visible peeling. PU surface cracking does not respond to conditioning the same way leather does because the failure mechanism is fundamentally different.
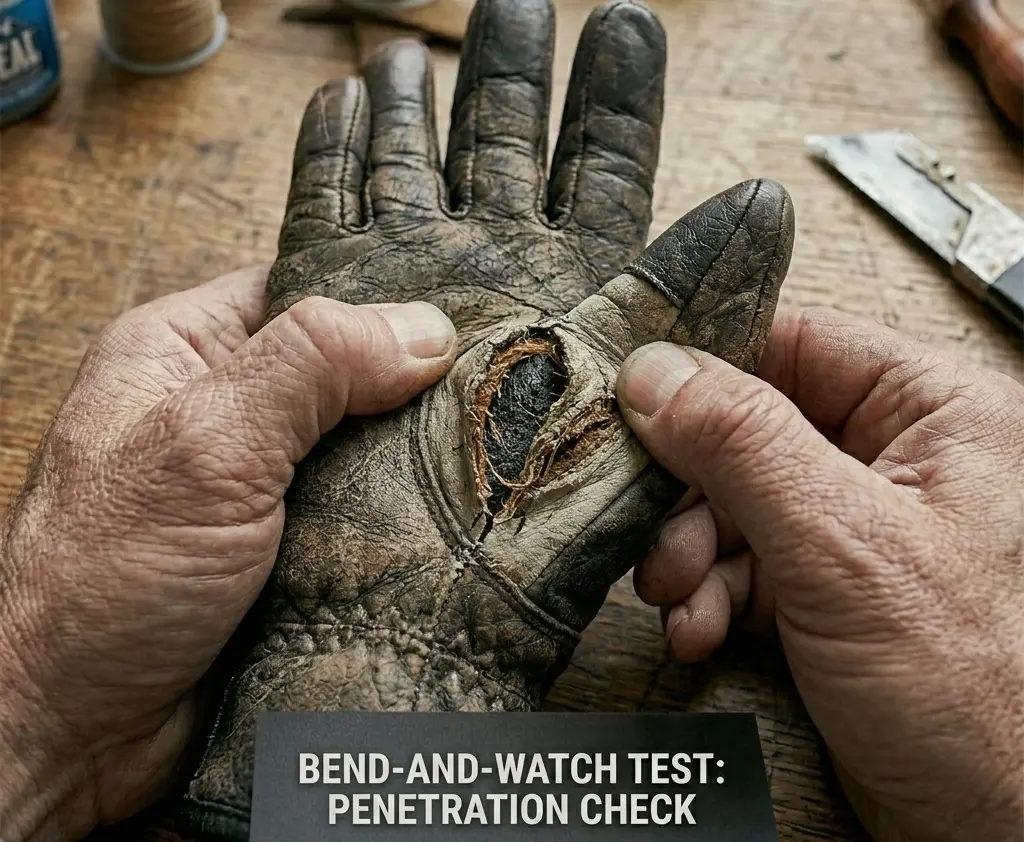
The most useful diagnostic test I run now is the bend-and-watch test: I bend the glove at the cracking zone and watch whether the crack opens, stays the same, or is not visible under bending stress. A crack that opens under bending is deeper than the surface. A crack visible only at rest and absent under bending is a surface finish issue. A crack that causes the surface to delaminate and peel slightly under bending indicates coating separation from the substrate — which is the delamination failure mode that cannot be reversed.
Three Tests to Identify What Stage Your Cracks Are At
Test 1 — The bend-and-watch test
Hold the glove at the cracking zone and bend it firmly but not aggressively at that point. Watch the crack closely. If the crack opens wider under bending, the damage extends past the surface layer. If it stays the same width or closes slightly under bending, it is a surface finish crack. If the surface material lifts or peels away from a layer beneath it under bending, that is delamination — a structural failure distinct from cracking. This test takes thirty seconds and tells you more about the crack’s depth and type than visual inspection alone.
Test 2 — The finger-pressure test
Press the pad of your index finger firmly across the cracked zone and slide it slowly. On leather, a surface crack feels like a raised ridge. A crack that has gone through the grain layer feels like a depression — the edges of the crack have separated and there is a gap rather than a raised line. On PU, run your finger along the crack edge: if the material adjacent to the crack feels firm and attached, it is surface cracking. If the material adjacent to the crack feels slightly loose or raises under your fingertip, delamination has begun around that crack.
Test 3 — The moisture penetration test
Run cold water over the cracked zone and press the glove interior lining at that point while it is wet. If moisture has come through the crack and you can feel dampness on the interior, the crack is through the full shell thickness and the glove’s waterproofing at that point is already compromised. This test is most useful for evaluating whether a cracked glove is still functional as a waterproof barrier, rather than for diagnosing the crack type.
A crack that penetrates the full shell thickness and allows moisture through cannot be restored to waterproof function by surface conditioning or treatment. Surface treatments seal the outer surface; they do not rebuild interior barrier function.
How Different Materials Crack — and Why It Matters for Your Decision
| Material | How It Cracks | Typical Timeline | Verdict |
| Full-grain leather | Slow and repairable — cracks start at flex points after oils deplete; conditioning reverses early-stage cracking | 5–7 seasons with maintenance; cracks only if neglected | Most crack-resistant with correct care; responds well to conditioning |
| Top-grain leather | Moderate speed — surface has been buffed which removes some natural oils; cracks faster than full-grain | 3–5 seasons; faster cracking under heavy use | Needs more frequent conditioning than full-grain |
| Split leather | Fast — little inherent oil content; cracks readily under cold and repeated flexion | 1–3 seasons; often cracks at seams first | Budget gloves only; conditioning helps but can’t fully compensate |
| PU-coated synthetic | Rapid under cold and flexion — PU stiffens at low temperature and micro-fractures; peeling precedes cracking | 1–2 seasons in regular use; one season in harsh conditions | Cannot be restored once PU begins separating from base fabric |
| Nylon / fabric shell | Does not crack — fabric frays and tears instead; different failure mode entirely | Does not apply | Relevant to note: cracking is a leather/PU-specific failure |
The practical implication of this table is significant: if you own leather gloves and catch cracking early, recovery is possible. If you own PU-coated synthetic gloves and cracking has reached the delamination stage, the timeline is replacement — not repair. Knowing which material you have determines whether you are making a repair decision or a replacement planning decision.
The simplest way to confirm your glove’s material at the palm: press your thumb firmly into the palm and hold for five seconds. Leather feels warm, slightly yielding, and has a natural texture. PU coating feels cooler to the touch, more uniform in texture, and has a slight plasticky resistance under pressure. This matters because the repair approach that extends a leather glove’s life does nothing useful for a PU glove at the delamination stage.
Condition-Based Diagnosis: What Your Specific Crack Pattern Means
| If Your Gloves Are Doing This | Root Cause | Right Response |
| Knuckle cracking only; leather still supple elsewhere | Early oil depletion at primary flex point | Condition immediately — this specific zone needs extra oil; addressable if caught early |
| Cracking at thumb joint specifically | Thumb crotch highest-flex point cracking first | Condition and reduce thumb extension stress; if through the surface, structural damage already present |
| Surface crazing (fine network of cracks under light) | PU micro-fracture pattern — coating stiffening stage | PU gloves: this is early delamination warning; condition won’t reverse it; assess replacement timeline |
| Peeling flakes rather than cracks | PU delaminating from base fabric | PU gloves: past recovery — delamination is structural; schedule replacement |
| Cracks across full palm surface | Severe oil depletion (leather) or full PU failure | Leather: assess depth — surface only may be recoverable; full-thickness cracks are not |
| Cracks only at seams or glued edges | Adhesive or seam stress failure, not material itself | Seam repair possible; structural integrity intact if material itself is uncracked |
| Cracking visible only on one glove | Asymmetric wear from dominant hand pole loading | Normal pattern — dominant hand wears faster; treat both gloves identically to maintain symmetry |
| New gloves cracked within first season | Thin PU construction — material insufficient for use | Construction failure — manufacturer defect threshold; consider a different model or material |
Mistakes That Accelerate Cracking
Conditioning PU gloves the same way as leather gloves. Conditioning works on leather by replenishing oils in a biological fibre structure. PU coating is a synthetic polymer — it does not absorb oil-based conditioners in the same way and does not benefit from them when cracks have already reached the delamination stage. Applying leather conditioner to a delaminating PU glove adds moisture to the interface between the coating and the fabric, which can actually accelerate separation. The correct response to PU cracking in its early stage is a PU-specific protectant, not a leather balm.
Treating a crack as purely cosmetic and continuing use without assessment. The first visible crack in either material type is a signal worth taking seriously — not because a single crack means the glove is done, but because the rate at which it progresses from that point is informative. A crack that doubles in length within three ski days is propagating actively; one that stays the same size after ten days has stabilised. Ignoring the first crack and not checking its progress means missing the window during which leather cracking is still recoverable.
Applying surface-only treatments to through-thickness cracks. A conditioner or waterproofing spray applied over a crack that has penetrated the full shell thickness seals the outer surface while leaving the interior structural damage unaddressed. The treated surface looks improved, which creates a false sense that the crack has been fixed. The next session reopens the surface and the underlying damage continues. This is the most common error I see with cracked gloves — treatment applied at the wrong stage, to the wrong type of crack, producing a cosmetic result with no structural benefit.
Buying gloves based on warmth rating alone without assessing material quality. A glove rated warm and priced low achieves that combination partly by using thin PU coatings or lower-grade leather with minimal oil content. These gloves crack within a season of regular use regardless of care because the material was not specified for the stress it encounters. The warmth rating tells you nothing about crack resistance. The material specification — full-grain leather, top-grain, split, PU coating thickness — tells you everything about it.
Warning Signs: When the Glove Is Past Recovery
| Warning Sign | Why It Means the Glove Is Done |
| PU flaking off in pieces during a session | Delamination is active — each flexion removes more coating; no fix stops this progression |
| Crack runs completely through leather thickness | Full-thickness crack means the structural layer is breached; water enters regardless of surface treatment |
| Multiple cracks across all high-flex zones | Generalised material failure — individual crack treatment cannot address a glove-wide structural decline |
| Leather feels brittle and snaps under gentle bend | Oil depletion is complete and irreversible at this point; conditioning adds surface moisture but cannot restore structural flexibility |
| Insulation visible through a crack in the shell | Shell has failed as a barrier — waterproofing and insulation protection are both compromised at that point |
| Seams separating alongside cracking material | Multiple concurrent failure modes indicate end-of-life; repairing one leaves the others unaddressed |
Any single item from this table indicates that the glove has crossed from a repairable condition into structural failure. The practical boundary is this: a crack that affects only the surface material and leaves the underlying structure intact is repairable with the right approach. A crack that has broken through the full shell thickness, caused coating delamination, or affected structural integrity is not.
Who Should Attempt Repair vs Who Should Replace
Repair is worth attempting if: The gloves are leather and the crack is caught before it penetrates the full grain thickness. The conditioning test produces visible improvement within 24 hours. The crack is limited to one or two specific flex points and the surrounding material is still supple. The gloves are otherwise in good functional condition — seams intact, insulation performing, waterproofing functional except at the crack site.
Replace without attempting repair if: The gloves are PU-coated and showing flaking or delamination — surface treatment will not re-bond coating to substrate. The leather fails the snap test — if it feels rigid and snaps under moderate bending rather than flexing, the oil depletion is complete and irreversible. Any crack is penetrating the full shell and allowing moisture through. Multiple concurrent failures — cracking alongside seam failure alongside insulation degradation — indicate end-of-life, not individual problems to address.
New gloves cracking within the first season: This is a construction quality failure rather than a maintenance failure. The material was not specified for the conditions or duration of use. Attempting to maintain or repair these gloves adds effort for limited return — the underlying material will continue failing. The right response is to treat this as information about the model and choose a different one with better material specifications next time. Full-grain leather or a higher-specification synthetic will start from a higher baseline.
Decision Checklist: What to Do With Your Cracked Gloves
Match your specific situation to the right response.
| Your Situation | Right Response | Decision |
| Surface crack only; leather still supple when bent | Condition thoroughly; increase conditioning frequency | Repair |
| Crack at one specific flex point; rest of glove intact | Condition with focus on that zone; apply wax over conditioner | Repair |
| Seam cracking or separating alongside material crack | Repair seam first; assess whether material crack is surface-only | Repair/Assess |
| PU surface showing fine crazing pattern | Early delamination warning — plan replacement within season | Monitor |
| PU coating actively flaking during use | Delamination underway — replacement needed | Replace |
| Crack runs through full leather thickness | Structural breach — conditioning cannot close it | Replace |
| Cracks across multiple zones simultaneously | Generalised material decline — past individual repair | Replace |
| Leather snaps or feels rigid under a gentle bend | Complete oil depletion — structural flexibility gone | Replace |
| Insulation visible through any crack | Shell barrier failed — replace immediately | Replace |
| New gloves cracked within the first season | Construction failure — try a different model or material | Replace |
The single most common error in cracked glove assessment: applying a leather conditioning treatment to a PU glove showing delamination, or treating a through-thickness crack as a surface problem. The crack type and material determine the response — applying the right treatment to the wrong stage produces no result and delays the correct decision.
Preventing Cracking: What Actually Works
Prevention for leather gloves is entirely about maintaining oil concentration before it drops to the threshold where cracking begins. The conditioning schedule that achieves this is more frequent than most skiers follow: every five to eight ski days, with extra attention to the thumb joint and knuckle line because those points lose oil faster than the rest of the glove. The test for whether conditioning is needed is straightforward — apply a small amount of conditioner to the thumb joint zone and watch how quickly it absorbs. If it absorbs within five minutes, the leather was ready for conditioning. If it sits on the surface for longer, the leather is already adequately oiled.
Prevention for PU gloves is fundamentally different because the failure mode is different. The primary enemy of PU coating is extreme cold combined with flexion — a combination that cannot be avoided during skiing. Cold exposure also reduces circulation in the fingers and hands during skiing, which is why conditions like Raynaud’s phenomenon can make cold-weather gear issues more noticeable. What can be managed is the temperature differential the gloves experience. Leaving PU gloves in a cold car overnight and then using them immediately in cold conditions means the coating starts a session at its most brittle. Cold temperatures trigger vasoconstriction in the hands, meaning blood flow to the skin drops significantly in freezing environments. Warming them to room temperature before use reduces the cold-stiffness cracking risk. A PU-specific protectant spray applied to the palm and finger areas before the season forms a surface layer that reduces friction against the coating during flexion — reducing the rate at which micro-fractures form.
For both materials, the most under-appreciated crack prevention factor is catching early cracking before it progresses. Gloves checked regularly — looking specifically at the thumb joint, knuckle line, and finger bases every four or five sessions — allow identification of surface cracking at the stage where intervention still works. A crack caught at two millimetres long is recoverable in leather and informative about timeline in PU. A crack discovered at twenty millimetres wide has already progressed past the recoverable stage in most cases.
The Right Way to Read a Cracked Glove
A crack in a ski glove is diagnostic information, not just cosmetic damage. Its location tells you which stress mechanism produced it. Its appearance — surface line versus delamination flake — tells you whether the failure is in the material itself or in the bond between layers. Its response to bending tells you how deep it goes. Its response to conditioning tells you whether the material can still absorb treatment or whether it has passed the stage where that is possible.
The skiers who get the most life from their gloves are the ones who read cracking correctly rather than either ignoring it or immediately discarding gloves at the first sign. A leather glove with a single early crack at the thumb joint, caught and treated correctly, can ski many more seasons. A PU glove showing surface crazing across the palm is already past the treatment stage and heading toward delamination — knowing that prevents the mistake of treating it as a leather conditioning problem when it is actually a replacement planning situation.
If your gloves are showing the warning signs covered above and you’re weighing whether to repair or replace, How Often Should You Replace Ski Gloves has a full decision framework based on skier type, usage frequency, and material condition — including the four diagnostic tests that give a clear answer.
About the Author
Awais Rafaqat has over 15 years of experience testing ski gear in some of the harshest conditions across North America, from the dry sub-zero peaks of the Rockies to the wet, freezing slopes of the Pacific Northwest. He specializes in real-world gear testing to help skiers find equipment that keeps them warm, dry, and performing at their best on every run.
© SkiGlovesUSA.com — Cracking mechanisms and material behaviour described from direct multi-season testing. No sponsored product mentions.