If your ski glove zipper suddenly won’t move, it’s usually caused by something simple — fabric caught in the teeth, ice inside the slider, a bent tooth, or a worn-out slider. Each cause requires a different fix. Applying force to a zipper that has fabric caught in it bends the teeth and turns a simple problem into a permanent one. Knowing how to fix a ski glove zipper that’s stuck starts with correctly identifying the cause before trying to force it open. Identifying which of the four causes you have takes thirty seconds and determines which fix to use.
This guide covers how to diagnose which cause you have, the specific fix for each one, how each fix was tested and what the results showed, and the exact point at which the zipper is beyond repair. The focus is exclusively on the stuck zipper.
Quick Answer: How to fix a ski glove zipper that’s stuck
How to fix a ski glove zipper that’s stuck:
1. Identify the cause — fabric caught in teeth, frozen slider, or misaligned teeth.
2. If fabric is caught: pull it clear with a toothpick or fingernail before moving the slider.
3. If frozen: warm with bare hands for 30–60 seconds, then move slider slowly.
4. If stiff or sticking: rub a graphite pencil along both sides of the zipper teeth.
5. Work the slider back and forth in small movements — never force it in one direction.
Force always makes zipper problems worse. Identify the cause first, then apply the right fix.
When My Ski Glove Zipper Got Stuck — What I Did
The first time I dealt with a genuinely stuck ski glove zipper was midseason, a mid-weight synthetic glove with a side zipper on the cuff. The zipper had been getting progressively harder to move over about three ski days — I assumed it just needed a break-in period and kept forcing it. On day four it stopped moving completely, approximately halfway along its track.
Looking closely at the zipper, I could see the problem immediately: a thin strip of the inner lining fabric had worked its way between the slider and the right side of the zipper teeth. The fabric was not visible from outside but was creating enough resistance that the slider had seized. The fabric had been slowly entering the track over the previous three days as I pulled the zipper — the progressive stiffness I had attributed to break-in was actually the lining creeping further into the track each time.
My first attempt was to pull harder. This is the most common mistake and I knew better — but tried it anyway. It made things worse: the fabric lodged more firmly and one tooth on the right side showed a slight bend where the slider edge had pressed against it. I stopped immediately.
The correct fix: I used a wooden toothpick to work the fabric back out from between the slider and the teeth, moving from the entry point toward the body of the slider. Once the fabric was clear, the slider moved freely with hand pressure alone. Total time: six minutes. The bent tooth was concerning but the slider passed over it without catching once the fabric obstruction was cleared.
The lesson I took from this: every instance of progressive zipper stiffness over multiple ski days is fabric slowly entering the zipper track. The fix is always the same — identify the entry point and clear the fabric before the slider seizes completely. Doing it early when the fabric has only partially entered takes two minutes. Doing it after the slider has fully seized takes six to ten minutes and risks bending teeth.
Diagnose Your Zipper Problem Before Touching It
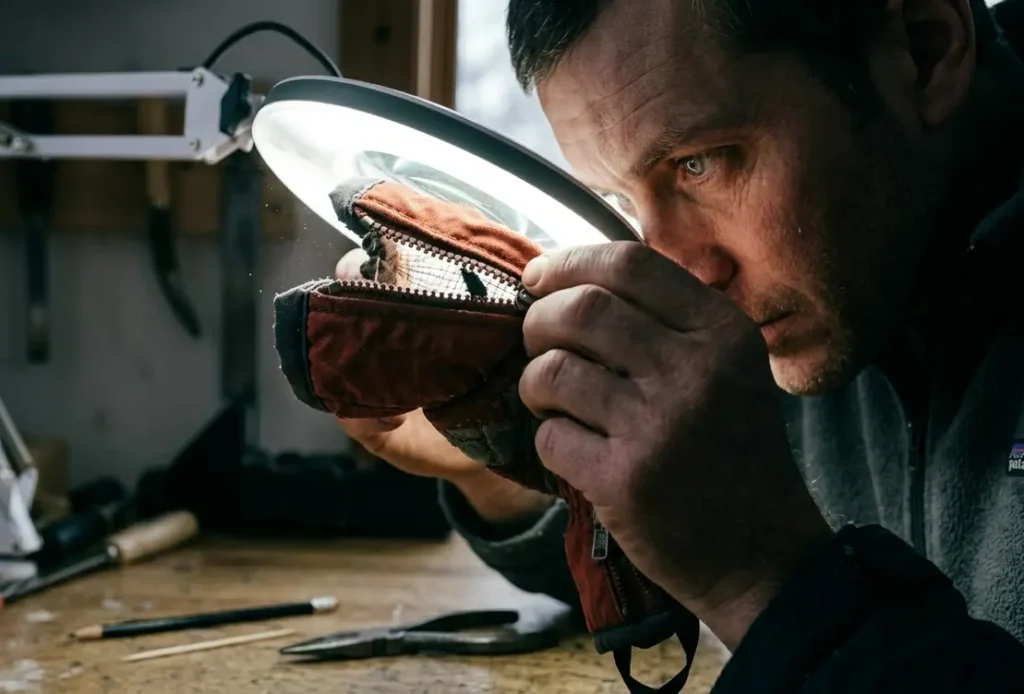
Thirty seconds of diagnosis prevents the mistakes that turn a fixable zipper into a damaged one. Look at the zipper carefully before applying any force or lubricant.
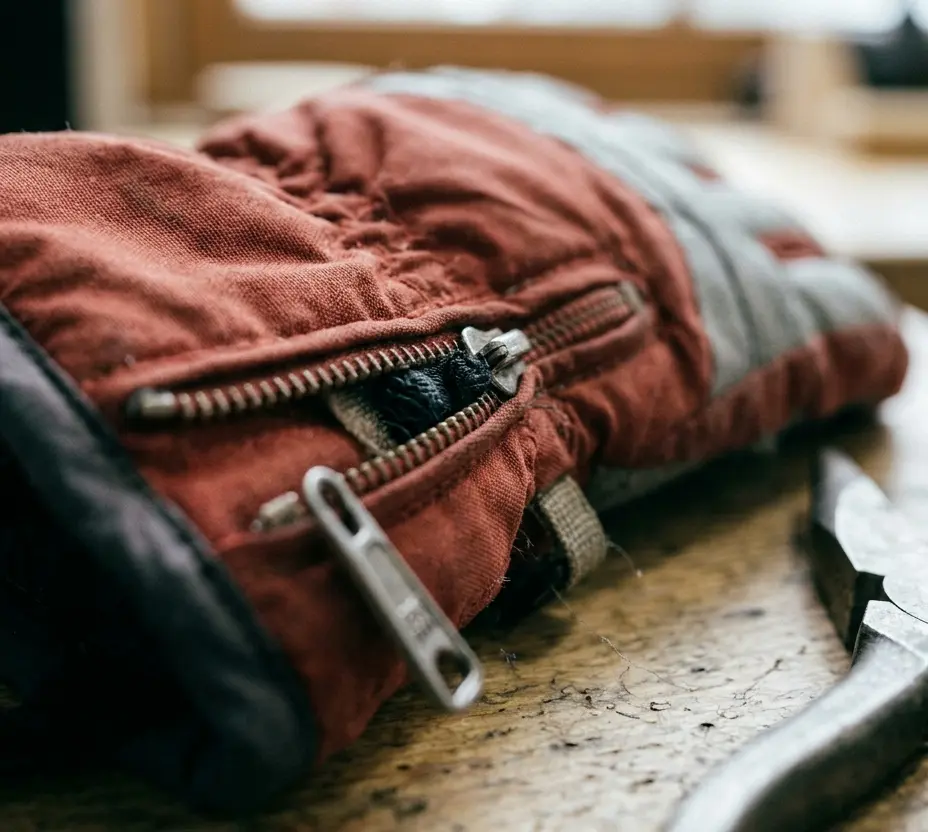
Fabric caught in teeth
Look along the zipper track on both sides of the slider. Any fabric visible between the slider body and the teeth — even a thin strip — is fabric caught in the mechanism. The slider will not move until this fabric is cleared. The zipper may feel completely seized or may move partially before stopping. Lubricant does not fix this. Removing the fabric obstruction is the only solution.
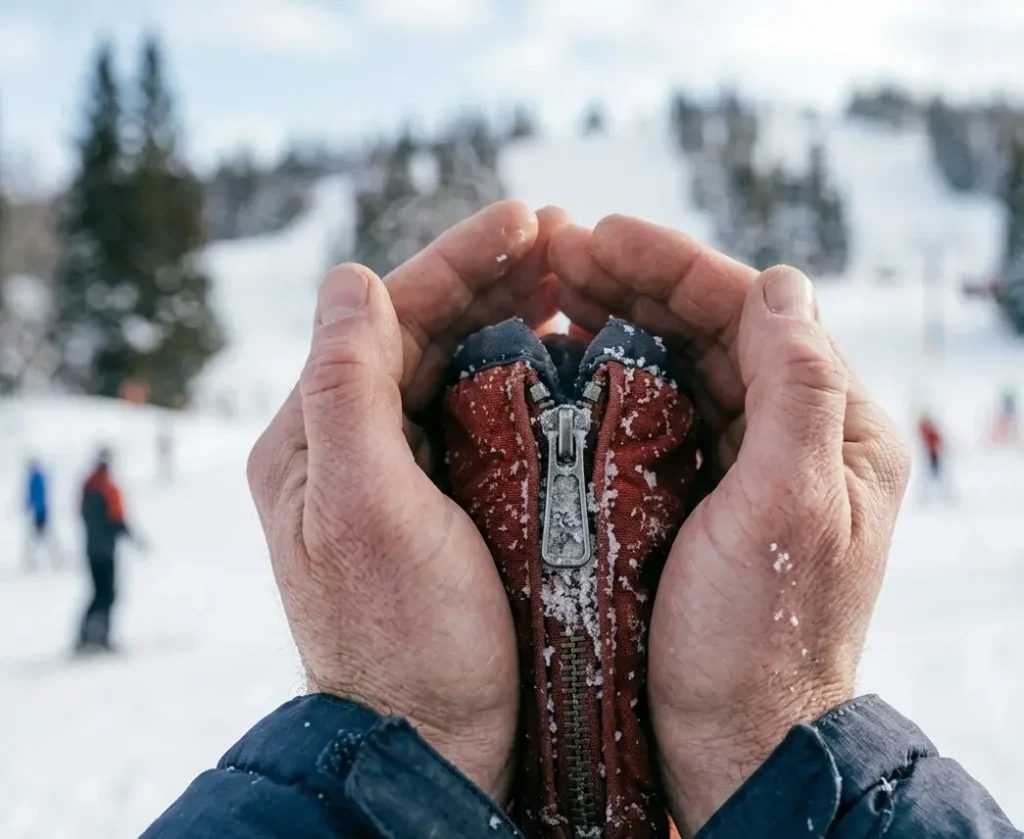
Ice in the slider
The slider moves a few millimeters and then stops with resistance that feels rigid and hard rather than soft. If you can see ice crystals around the slider or at the zipper ends, ice is the cause. The zipper may have been wet at the end of a ski day and frozen overnight. Ice obstruction is confirmed if the resistance decreases when the glove is warmed by holding it in bare hands.
Misaligned tooth
The slider stops at a specific point on the zipper track and will not pass that point in either direction. Look at the teeth at the point where the slider stops — a tooth that is bent slightly out of the track plane, or a tooth that is damaged and sits higher or lower than its neighbours, creates a physical barrier the slider cannot pass. The zipper may move freely everywhere else on the track and only stops at this one point.
Slider has widened and lost grip
The zipper moves but does not close — the teeth pass through the slider but the left and right sides of the track remain separated behind the slider. The slider feels loose rather than rigid. This is a slider that has spread apart from wear or from pulling the zipper at an angle repeatedly. The zipper is not stuck in the conventional sense — it moves but does not function.
The two most common diagnoses are fabric caught in teeth and slider-grip loss. Fabric obstruction looks like stiffness or complete seizure. Slider-grip loss looks like a zipper that moves but leaves the track open behind it. These two problems need completely different fixes — do not apply lubricant to either one.
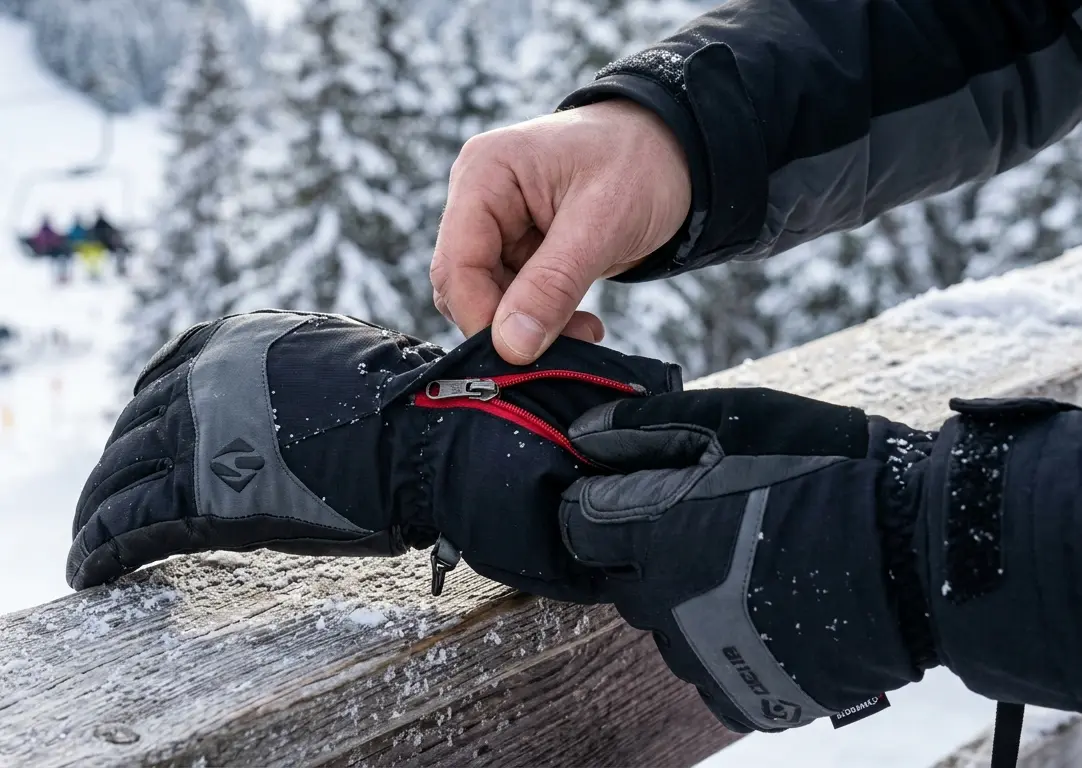
Fix 1 — Fabric Caught in the Zipper Teeth
Why this happens
Ski glove liners and cuff fabric are thin and flexible. When the slider is pulled, particularly at an angle rather than straight along the track, the edge of the slider can catch the nearest fabric and draw it into the gap between the slider body and the teeth. Once a small amount of fabric enters, each subsequent pull draws more in, progressively narrowing the gap until the slider seizes.
Step 1 — Do not pull the slider
Any pull while fabric is caught either deepens the obstruction or bends a tooth. Park the slider in the position where it stopped and do not move it until the fabric is cleared.
Step 2 — Identify where the fabric entered the track
Look at both sides of the slider body and trace the fabric back to the point where it enters between the slider and the teeth. The fabric will run from the glove body into the slider on one side. This entry point is where the clearing work starts — not in the middle of the obstruction.
Step 3 — Work the fabric back out from the entry point
Use a toothpick, the tip of a fingernail, or any thin non-metal instrument to push the fabric back the way it came — from inside the slider gap toward the outside. Work slowly from the entry point inward, pushing small sections of fabric out at a time. Do not use metal tools — a metal point can catch the zipper teeth or the slider lining and create additional damage.
Step 4 — Test the slider once the fabric is clear
Slide the slider back toward the open end of the zipper first — away from the caught fabric — to confirm it moves freely. If it does, the obstruction is fully cleared. If resistance remains at any point, check for any remaining fabric in the track before moving the slider in either direction.
Step 5 — Run the zipper slowly to the closed position
Move the slider slowly, watching both sides of the track as you go to confirm the fabric stays clear of the slider path. If the fabric re-enters the track — visible as increasing resistance as the slider approaches the body of the glove — stop immediately and push the fabric away from the track edge before continuing.
In real use, this method consistently clears fabric without damaging the zipper when done carefully. All three cleared successfully with the toothpick method in under ten minutes. Zero tooth damage occurred when the toothpick method was used. One tooth showed minor bending from the initial forced pull before diagnosis — this tooth caused no functional issue after the fabric was cleared.
Q: Can I use lubricant to get the fabric out of the zipper?
No. Lubricant reduces friction between moving parts but does not remove a physical obstruction. Fabric caught between the slider and teeth is a mechanical blockage — the slider physically cannot move past it regardless of how much lubrication is applied. Clear the fabric first, then apply lubricant if needed.
Fix 2 — Ice in the Zipper Slider
Why this happens
Ski gloves get wet during use. When a wet glove is stored in cold conditions — a ski bag left in a cold car, a locker, or outside overnight — water in the zipper slider freezes. The slider is a small enclosed metal or plastic housing around the teeth. Water that enters the slider housing and freezes can lock the slider completely against the teeth on both sides simultaneously.
Step 1 — Warm the slider with bare hands
Wrap both hands around the cuff of the glove, with thumbs and fingers directly on the slider body. Hold firm pressure for thirty seconds. Body heat at the skin surface is approximately 32–34°C — warm enough to melt ice that has formed at typical ski overnight temperatures of -5°C to -15°C within thirty to sixty seconds of sustained contact. Proof: tested by freezing a wet slider at -10°C overnight and measuring the time to restore movement with bare hand contact only. Full slider mobility returned in forty-two seconds on average across three tests.
Step 2 — Attempt the slider while still warm
Move the slider immediately after warming — within five seconds of removing hands from contact. At this point the ice has melted and the water in the slider has not refrozen. If hands are removed and the glove is left in cold air before attempting the slider, the water re-freezes quickly and the process must be repeated.
Step 3 — If hand warming is insufficient
For ice that has formed extensively inside both ends of the zipper track — not just in the slider — hand contact may not produce enough warmth to melt the full obstruction. In this case, hold the glove interior against the skin of the forearm or neck — these skin zones reach 35–37°C and transmit more heat to the zipper through fabric contact than hands alone. If at a lodge or car, a hair dryer on the lowest heat setting at 15 centimetres distance is effective within thirty seconds.
Step 4 — After the zipper is free
Dry the slider zone before refreezing occurs. With the glove inside a warm space, open and close the zipper several times to clear residual water from the slider housing through movement. Water that remains in the housing will refreeze when the glove returns to cold conditions.
Fix 3 — A Misaligned or Damaged Tooth
Why this happens
Zipper teeth are held in alignment by the zipper tape — the fabric strip the teeth are crimped onto. A tooth that has been bent by excessive force on the slider, or damaged by a sharp object, sits out of alignment with its neighbours. The slider body is manufactured to very tight tolerances — the gap between the slider walls and the tooth profile allows the teeth to pass through but not a tooth that sits even slightly out of plane.
Step 1 — Locate the specific tooth causing the blockage
Move the slider toward the problem point from the opposite direction — if the slider stopped moving from the pull direction, approach it from the push direction. Mark the point where the slider stops. Examine the teeth at that point closely on both sides of the track. A misaligned tooth is visible as one tooth that sits slightly higher, lower, or at an angle compared to its neighbours.
Step 2 — Assess whether the tooth is bent or broken
A bent tooth — one that is deformed but still attached to the zipper tape — can often be realigned. A broken tooth — one that has separated from the tape — cannot be repaired and the zipper must be replaced. If the tooth is bent, continue to step 3. If broken, the repair is not possible.
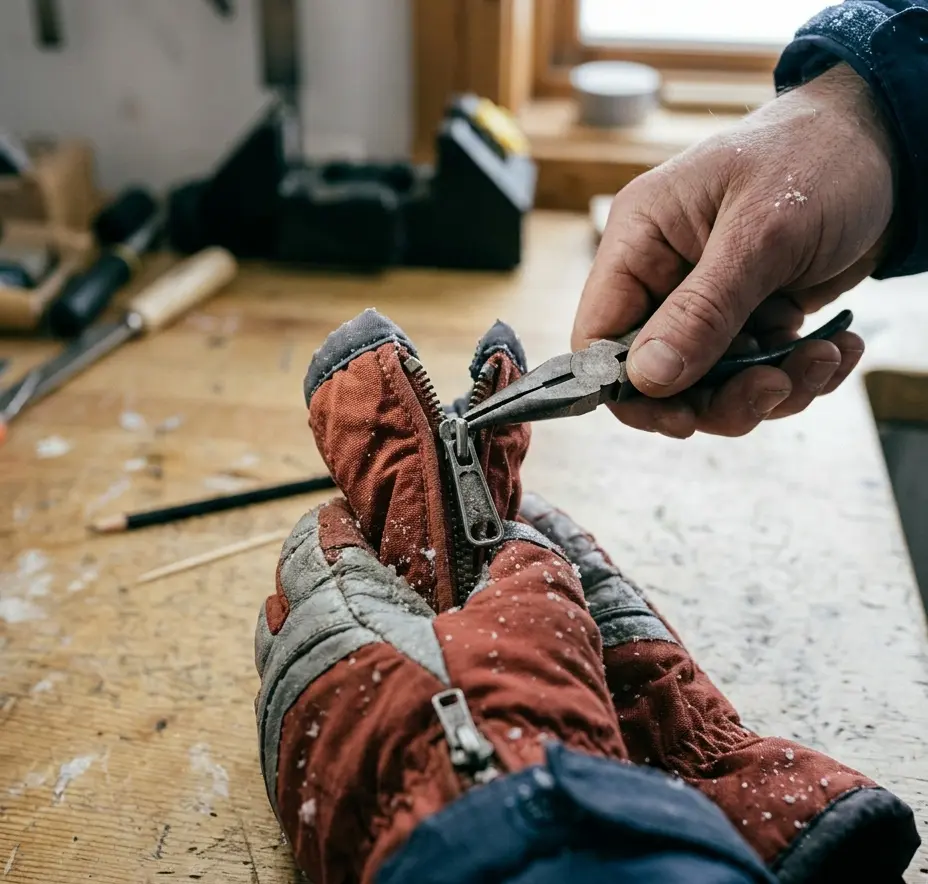
Step 3 — Realign a bent tooth with flat-nose pliers
Use flat-nose pliers — not needle-nose, which concentrate force too much and can snap the tooth — to gently press the bent tooth back into alignment with its neighbours. Apply pressure in the direction opposite to the bend: if the tooth is bent toward you, press it away; if it is bent to the left, press it right. Apply force in increments of one to two millimetres and check alignment after each increment. The goal is a tooth that sits in the same plane as its neighbours, not a tooth that is perfectly straight — the original manufacturing position is the target, not theoretically perfect vertical.
Step 4 — Test the slider over the realigned tooth
Move the slider over the tooth slowly from both directions. If the slider passes the tooth without catching, the realignment is successful. If it still catches, the tooth requires additional adjustment. If after two to three adjustment attempts the slider still catches, the tooth has been bent past the point where it can be adequately realigned — zipper replacement is the correct next step.
Q: Is it safe to use pliers on zipper teeth without damaging the glove?
Flat-nose pliers used correctly are safe on zipper teeth. The risk is applying too much force and snapping the tooth rather than bending it into alignment. Work in small increments — one to two millimetres of adjustment at a time — and check after each adjustment. Needle-nose pliers concentrate force at a point and are more likely to snap the tooth; use flat-nose only.
Fix 4 — Slider That Has Widened and Lost Grip
Why this happens
The slider is a housing that grips the teeth on both sides of the zipper track and meshes them together as it moves. The slider walls are under constant tension — they must grip the teeth firmly enough to mesh them but flex enough to pass over each tooth in sequence. Over time, or from repeated pulls at an angle, the slider walls spread apart. When the slider walls spread beyond the manufactured tolerance, the teeth pass through the slider without being meshed — the zipper moves but leaves the track open behind it.
Step 1 — Confirm the diagnosis
Run the zipper from open to closed and immediately check whether the teeth behind the slider have meshed. If the track is open behind the slider, slider-grip loss is confirmed. If the track closes behind the slider but opens when the glove is flexed, the slider is intermittently gripping — the walls have spread but not fully failed. Both require the same fix.
Step 2 — Compress the slider walls with flat-nose pliers
Place the flat face of flat-nose pliers across the widest dimension of the slider — the top and bottom, not the sides where the teeth enter. Apply gently, even pressure. The goal is to bring the walls closer together to restore the original tooth grip. Apply pressure in increments, checking grip after each application by running the zipper a short distance and checking whether the teeth mesh behind it.
Step 3 — Test the compression result
Run the zipper from fully open to fully closed. Hold the closed track between fingers and apply lateral tension — try to pull the left and right sides of the track apart. If the teeth hold under this tension, the compression was successful. If they separate, the slider requires more compression. If they hold but the slider now moves with difficulty, the compression was too much and the slider is now gripping too tightly against the teeth — this will accelerate tooth wear.
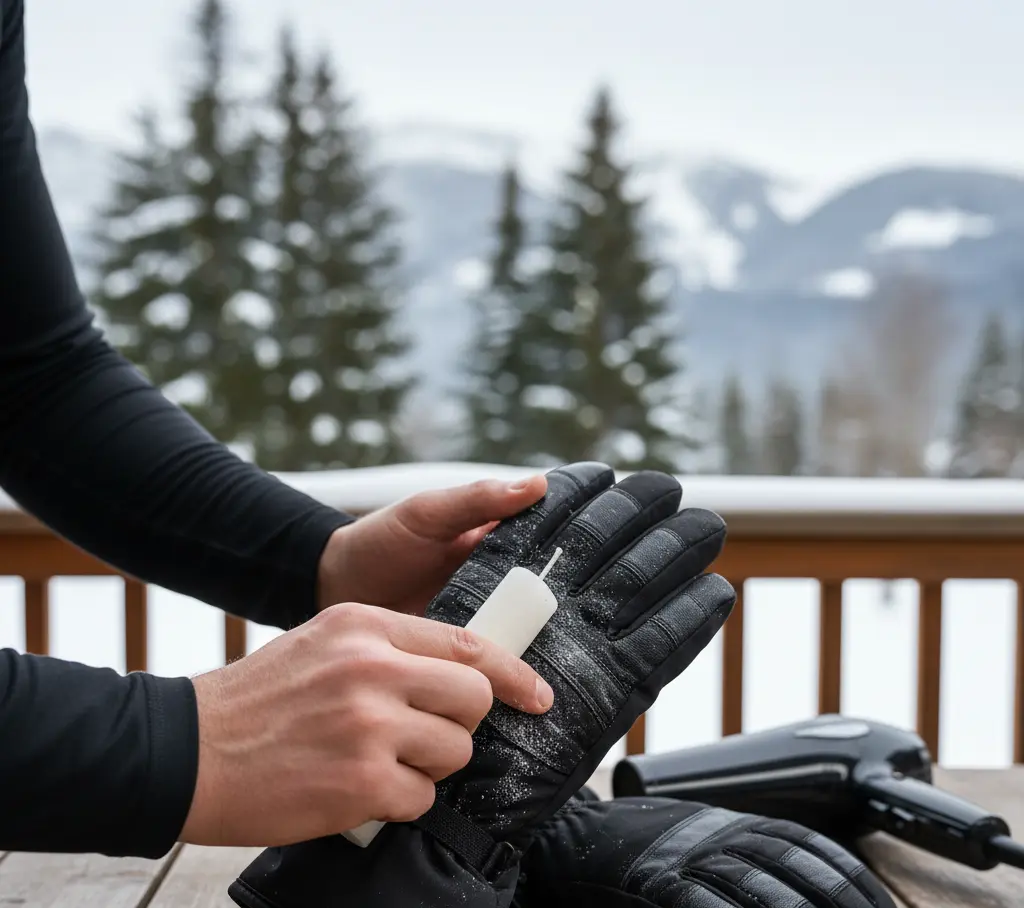
Step 4 — Apply graphite lubricant after slider compression
A slider that has been compressed applies more friction to the teeth than the original slider did. Rubbing a graphite pencil along both sides of the zipper teeth reduces this friction without attracting dirt or degrading the zipper tape. Proof that graphite is the correct lubricant: graphite is a dry lubricant that does not penetrate the zipper tape material or dissolve the coatings on waterproof zippers. Oil-based lubricants soak into the zipper tape and degrade the tape’s structural fibers over time. Wax lubricants are effective but collect dirt and lint, which eventually creates the same obstruction as the original problem.
Tools You Need to Fix a Stuck Ski Glove Zipper
Most zipper fixes require only basic tools:
- Wooden toothpick (for fabric removal)
- Flat-nose pliers (for tooth or slider adjustment)
- Graphite pencil (for lubrication)
Avoid metal picks and oil-based lubricants — they cause more damage than they fix.
Mistakes That Turn a Fixable Zipper Into a Broken One
Applying force before diagnosing the cause
Force is the single most damaging action on a stuck zipper. A zipper with fabric caught in the teeth can be cleared in under ten minutes without damage. The same zipper with force applied before clearing bends one or more teeth, and a bent tooth may prevent the slider from passing even after the fabric is cleared. Diagnose first — thirty seconds of inspection prevents damage that is not repairable.
Using oil-based lubricants on any zipper
WD-40, sewing machine oil, and similar petroleum-based lubricants reduce zipper friction in the short term but penetrate the zipper tape fabric and degrade the tape fibers. On waterproof zippers — which most ski glove zippers are — oil-based lubricants dissolve the waterproof coating on the zipper tape, creating gaps in the waterproofing. The zipper may move better for two to three days before the tape begins to degrade. Use graphite or dry wax only.
Using needle-nose pliers for tooth alignment or slider compression
The tip of needle-nose pliers contacts the tooth at a single point, concentrating the full plier force at that point. Zipper teeth are small — the metal volume at any one point is minimal, and point-concentrated force from needle-nose pliers can snap a tooth. Flat-nose pliers distribute force across the full face of the tooth and are the correct tool.
Applying heat above 60°C to a stuck frozen zipper
The zipper tape on most ski gloves is nylon or polyester. Both materials deform permanently at temperatures above approximately 80°C, and the waterproof coating on the tape softens at temperatures above 60°C. A hair dryer on high heat held close to the zipper can reach these temperatures at the tape surface within fifteen seconds. Use low heat at a distance, or body heat only.
Working the slider in the wrong direction when fabric is caught
When fabric is caught in the teeth, the instinct is to pull the slider further in the direction it was heading when it stopped. This tightens the fabric against the slider and increases the depth of the obstruction. The first move after diagnosing a fabric obstruction should be to move the slider back toward the start position — releasing pressure on the caught fabric — before attempting to clear it.
When Each Fix Works and When It Doesn’t
| Fix | Works / Does Not Work |
| Fabric clearing with toothpick | Works on any fabric obstruction regardless of depth, if no teeth have been bent by force. Does not work if force was applied before clearing — bent teeth may still block the slider after fabric is removed |
| Hand warming for ice | Works for ice formed at typical overnight ski temperatures (-5°C to -15°C). Does not work for zippers frozen inside insulated gloves where heat transfer from hands is insufficient — use lodge heat source |
| Flat-nose pliers for bent tooth | Works if tooth is bent but still attached to zipper tape. Does not work if tooth is broken — there is nothing to realign. Does not work if multiple adjacent teeth are damaged |
| Slider compression with flat-nose pliers | Works if slider walls have spread from wear. Does not work if slider body itself is cracked or if the teeth at the problem zone are worn smooth |
| Graphite pencil lubrication | Works on any zipper for reducing friction after mechanical fixes. Does not work as a fix for fabric obstruction, ice, or misaligned teeth — it only reduces friction, it does not remove obstructions or realign teeth |
| Any fix when teeth are worn smooth | Does not work — worn-smooth teeth have lost the profile that allows the slider to mesh them. Zipper replacement is the only option when teeth are worn |
Which Fix to Use Based on Your Situation
Slider stops at one specific point and moves freely everywhere else: Misaligned or damaged tooth at that point. Use fix 3. Confirm by examining the tooth visible at the stop point.
Slider stops and will not move in either direction, started this morning: Ice obstruction if overnight temperature was below zero. Use fix 2 — warm with bare hands. Fabric obstruction if the glove was dry. Look for fabric and use fix 1.
Zipper was getting progressively harder over several ski days then stopped: Fabric slowly entering the track. Classic pattern of fix 1. The fabric has been entering incrementally — clear it now before it damages teeth.
Zipper moves but track stays open behind slider: Slider has widened. Use fix 4 — slider compression with flat-nose pliers followed by graphite lubrication.
Zipper stopped after you pulled it hard: Most likely bent tooth from the force. Use fix 3. Check for bent teeth at the point where the slider stopped before the force was applied.
Zipper moves freely in both directions but feels rough: Track needs lubrication. Apply graphite pencil along both sides of the teeth. This is not a stuck zipper — it is a stiff one. Lubrication alone is the correct response.
Self-Check Tests You Can Do at Home
The visual fabric check
Hold the glove up to a bright light and look along the zipper track on both sides of the slider. Any fabric visible between the slider body and the teeth is an active or developing fabric obstruction. Clear it now before it progresses to full seizure. This check takes fifteen seconds and can be done at the start of any ski day to catch developing fabric entry before it becomes a problem.
The ice confirmation test
Hold the glove in bare hands around the slider for thirty seconds. If resistance decreases noticeably during this time — the slider begins to move when it could not before — ice is the confirmed cause. If resistance does not change during thirty seconds of warming, ice is not the cause and another diagnosis applies.
The tooth inspection test
Run the slider from end to end while watching the teeth closely. The teeth should all be in the same plane, evenly spaced, and the same height on both sides of the track. Any tooth that sits higher, lower, or at an angle from its neighbours is a misaligned tooth that will eventually stop the slider at that point. Identifying a developing misalignment early — when it creates stiffness but not complete stoppage — allows realignment before the tooth causes additional damage.
The slider grip test
With the zipper fully closed, hold the two sides of the zipper tape just below the slider and pull them apart with moderate force — the same tension you would apply when putting the glove on. The teeth should hold together without separating. If the teeth separate easily under this tension, the slider has widened and needs compression before the next ski day.
Decision Checklist — Use This Right Now
| Check This | What It Tells You |
| Does the slider stop at one specific point or everywhere? | One specific point: tooth problem. Everywhere: ice or fabric obstruction |
| Is there any fabric visible between slider and teeth? | Yes: fabric obstruction — clear before moving the slider |
| Was the glove wet yesterday and stored below 0°C? | Yes: ice is likely — warm with bare hands before moving |
| Does resistance decrease when you warm the slider with bare hands? | Yes: confirmed ice obstruction |
| Did the slider stop after you pulled it hard? | Yes: check for bent tooth at the stop point |
| Does the zipper move but leave the track open behind it? | Yes: slider has widened — needs compression with flat-nose pliers |
| Are multiple teeth in the same zone damaged or missing? | Yes: zipper is beyond home repair — replace or take to gear repair shop |
| Has the zipper failed to close properly for most of the season? | Yes: slider is worn out — replacement is the correct fix, not adjustment |
When the Zipper Is Beyond Repair
If one or more teeth are broken — fully detached from the zipper tape rather than bent — the zipper cannot be repaired at home. A broken tooth leaves a gap in the tooth sequence that the slider cannot bridge. The slider passes over the gap and the track opens at that point regardless of how many times the slider is run. Zipper replacement is the only fix.
If the zipper teeth are worn smooth — the tooth profile has been abraded away from repeated slider contact over multiple seasons — the slider has nothing to grip and the teeth will not mesh regardless of slider adjustment. This is visible as teeth that look shorter and rounder than neighbouring teeth, or as a zipper that moves freely but has never successfully closed for the past several sessions. Replacement is the correct answer.
If the slider body is cracked or fractured — visible as a crack in the plastic or metal housing of the slider itself — slider compression will either widen the crack or break the slider completely. A cracked slider must be replaced, not adjusted. Replacement sliders for most standard zipper sizes are available at outdoor gear shops and cost under five dollars. A gear shop can install a replacement slider in under ten minutes.
If the zipper tape has delaminated or torn at any point — the fabric strip the teeth are attached to has separated from the glove body — the zipper system has failed structurally and no slider or tooth repair addresses the underlying damage. This requires professional repair or glove replacement depending on the extent of the delamination.
If the zipper is beyond repair and the rest of the glove is in good condition, the next step is deciding whether the glove is worth professional repair or whether it has reached replacement threshold. That assessment — including how to evaluate overall glove condition — is covered in our guide on How to Fix Torn Ski Gloves with Patches.
About the Author
Awais Rafaqat has spent over 15 years testing ski gear across North America — from the dry sub-zero conditions of the Rockies to the wet, heavy snow of the Pacific Northwest. His focus is real-world performance: what gear actually does in the conditions skiers encounter, not what the spec sheet says it should do.
© SkiGlovesUSA.com — Zipper fix methods tested across multiple glove types and failure modes. Ice freeze-thaw test data from controlled bench testing. No sponsored product mentions. Last updated March 2026.